Showing posts with label gunwales. Show all posts

Sunday, July 3, 2011

Sawdust-n-Sails

Yesterday, I was able to spend nearly the full day working on Shan Skailyn. Shannon (my wife) and the kids were all busy with other stuff and gone much of the day. Only restrictions had to do with baby Abigail and her naps. No tools during naps!
So I finished cutting and planing the chines and the last little bit on the gunwales. I sorted through a bunch of other lumber and pulled out what I'll be using for the bulkhead perimeters, stems, seat supports and the like. Will be using a bunch of cutoff pieces from when we installed our floor. It's all 3/4" x 4" mixed hardwood tongue and groove flooring cutoffs, including stuff like kwila (ironwood), mahogany, and other standard hardwoods found here in Papua New Guinea. I tried to divvy them up so that the hardest stuff (ie. kwila) is to be used for the ama struts and the sides of the bulkhead perimeters where the bolts will be passing through. Then I'll want the lighter weight stuff to be used in all the other places.
Still haven't determined what I'll use for the iakos. Actually contemplating using bamboo, but I remember reading that Gary Dierking's concern with using those is that unless a way is found to provide structural support at the lashing points, that may be a major weakness. The walls of bamboo can be prone to crushing under such strain as the iakos experience. Will have to think about that and also experiment with bending the bamboo. I'm perfectly happy to do the either the laminated solid iakos or the hollow box frame construction like in Gary's book, but it seems that bamboo would be the lightest option if it would be strong enough at the lashing points and formable enough to get the downward curve at the ends.
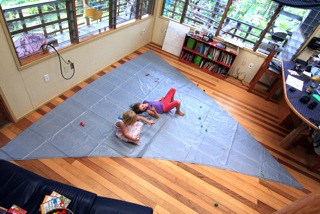
I also managed yesterday afternoon to cut the sail out of my tarp material. Moved all the furniture out of the living area in our house. The kids were around then and thought it was a blast! So we laid out the sail, cut it, and even sewed the leech seam as well as a single dart in the foot and one in the tack (for the equivalent of the broad seam).
One thing I'm very concerned about at this point, and would LOVE to get some feedback on before proceeding any further) is whether or not sewing is the best option on this tarp. This polytarp is not of the woven variety. It's a solid piece of plastic. Same material, just not woven. Well my fear has been that sewing the unwoven stuff would actually serve only to act as a perforation line, making for a weak spot in the sail where it will be likely to tear. Well on my test pieces, I'm finding that to be true. It takes quite a bit of pulling to make it happen, but it does tear right along the stitches. It does require strong pulling for it to tear, but it always tears along the stitch. One thing I'm thinking about (assuming I decide to keep this material for the sail) is taping over all the seams as a backup, using either duct tape or packing tape. But I really would like for this sail to look nice if possible. Any ideas or thoughts out there? I need some help figuring out what the best long term solution will be here! If you have thoughts, post your comments!


Saturday, June 25, 2011

Beginnings from the bush

Back in the bush now.
This was the first weekend to attempt some work on Shan Skailyn. Altogether about 3 hours worth. I'm using a bunch of lumber that has been here since we originally built our house back in 2004. It's all rough cut stuff and looks all moldy and mildewy from years of sitting under the house on a storage rack. So the first step needed is to plane it down. Found a couple pieces of what is called 'ton' (sounds like 'tone' in Pidgin English - the national trade language of Papua New Guinea). One thing I've learned about ton is that it's very prone to dry rot. 25 minutes of planing these pieces reveals that they are totally unusable; full of dry rot. Might make some good firewood or something.
I actually have a few pieces of teak, but not enough to use for the gunwales as I would have wanted. Probably a good thing because that stuff gums up my saw and planer blades pretty bad.
So I dug through and found some other lumber that might work for the gunwales. Fairly heavy and tight grained stuff. NO DRY ROT!!! In Pidgin they call it 'galip' (pronounced 'ga-leep'). Not sure what we know it to be in English. It's a bit like mahogany though. I wonder if it's the same. It seems too heavy and a fair bit more dense. Anyone out there happen to know what this might be? It would be nice to know. Gary D., you seem to have had some experience with PNG lumber. If you're reading this, any idea what 'galip' wood is? It grows on the coast. It has nuts that the people eat.
Anyway, I planed it down and cut all the pieces for the gunwales, which I want to be a stronger variety of wood than the chines. As far as the chines are concerned, I'm hoping to cut those maybe next weekend.
Other than that, I spent a bit of time sharpening my hand planes, organizing my shop a bit in preparation for this 'little' weekend hobby, and chatted with some of my Mibu friends that were in the area and wanting to hang out a bit. I almost always stop work to spend time chatting with them!
WIth just about 20 minutes left available to work, I decided I'd start planing the edges of my plywood, which I had only rough cut when we were out in town recently. I had cut all the matching pieces at the same time so that they matched exactly. Did the same with the edge planing, checking with a combo square as I went along. Since any mismatches will come together creating a warped hull, perfection is important here more than almost anywhere else.
Oh yeah... also found out that my bamboo has been cut (I hired a friend who wanted a little work) and is currently soaking in the river. Should be just a matter of weeks before I see it and can judge whether or not it will work for me.
In this picture, you see the four pieces of 6mm plywood that will make up the sides of the two end sections of Gary's Wa'apa design. In the foreground is what will eventually be the stern and the bow of the canoe. I've put a screw through each end of all four pieces to hold them together so I can plane all four edges to a perfect match.
..