Showing posts with label sail. Show all posts
Showing posts with label sail. Show all posts
Friday, January 17, 2020
Saturday, January 5, 2013
Tying Up Loose Ends

I was sure to practice reefing and un-reefing the sail at least once each day. I'm really happy with how smooth the whole thing works. Now we'll have to see how it works out at sea, likely with at least some wind to fight against. One thing I realized is that it would be really easy to ignore the fact that the boom can give me a pounding not soon to be forgotten while reefing!
Finally I was able to rig up the harness by which the helicopter can safely sling Shan Skailyn down to the coast in not quite eight weeks time now. It's good to work out little details like that ahead of time. I'm regretting not having taken a picture of the thing all harnessed up. What was I thinking?
I've been working with Sesi too, teaching him some of the more important things about the boat and what he'd need to do in an emergency, like if Kyle and I both got knocked off the boat. For example, he needs to know how to depower the sail. Obviously there's so much more, but I don't want to bore you with too much detail, which I may have done already.
I've been very anxiously awaiting a package that I had mailed to me back in early October with all the last little tidbits that are needed to finish the boat as well as some essentials for the trip. This package has taken an unusually long time to arrive and my last chance to get it is coming up in just two days. I'll find out on Monday when the helicopter does our next supply run if the package is here. Gonna have to improvise on some things if it hasn't.
Shan Skailyn has been assembled in our yard all week and it's quite a hit for our friends passing by. During my week off it was fun to hang out around the boat and explain how it works. Most have never seen a sailboat before. "Where's the motor?" they keep asking. They can't believe that the wind alone is supposed to make Shan Skailyn move. It's a crazy thing this whiteskin is doing up here on the mountain!
Tuesday, December 18, 2012
Dig the Rig

Sunday, December 9, 2012
Reefy Reeferson!


Just FYI, this system reefs 25" of the foot of the sail, which is very nearly, if not a perfect, 1/3 of the total sail area, or about 27.7 square feet.
One thing I've noticed is that finding good pictures of all the details of a system's rigging have been hard to find (when I actually have access to internet in town, that is). If I can scrounge up the time, I'm hoping to put together some pictures of details of the rigging.
Thursday, September 13, 2012
In Pieces

Shan Skailyn's hull is made to disassemble into three 8' sections for storage in smaller spaces.
Monday, September 10, 2012
All assembled... again


Saturday morning I disassembled the whole thing again and moved all the parts into our little office building where I store it here in Mibu. Now that I have everything built, I'd really like to weigh everything and get a total rigged weight. Really curious what that is. Will post when I do end up doing that.
Really the only difference in these pictures is that I have Shan Skailyn's hiking seats installed. I took a number of other photos of details that I'll post throughout the week. So stay tuned.
Thursday, August 30, 2012
Mast and Boom Assembly

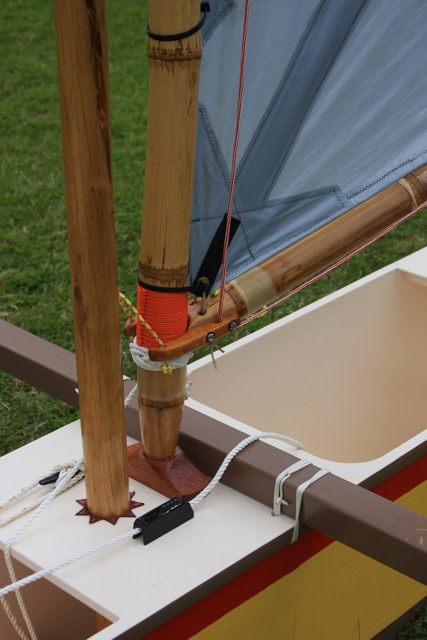
Note the two cleats on either side of the stub mast. The one on the right in the picture is for the halyard, so I can quickly release in case things feel out of control (necessary for this unexperienced wanna-be sailor). The other cleat is for the rope that keeps the luff spar tensioned in it's universal joint.
Saturday, August 25, 2012
Raise the Sail

Today was an exciting day! For the first time ever I got to see how Shan Skailyn's rigging is all going to work out. Raise that sail!
Saturday, July 16, 2011
Sails Away


So this is what a couple weeks of piddling (10 minutes here, 20 minutes there, another 15 minutes there, plus a couple larger blocks of time on the weekend) can accomplish. I've managed to finish sewing up Shan Skailyn's poly tarp sail. Feels pretty good to actually get something completed! It's all sewn with polyester thread. I got the grommets from duckworks and am really happy with the quality. They're heavy duty and installed just as easy as could be.
My sail follows the plan for the 24' Wa'apa tacking sail in Gary Dierking's book.
I also worked some today (Saturday) on the hull. Pictures forthcoming...
Monday, July 4, 2011
2011_07_4855.jpeg

File Name: 2011_07_4855.jpeg
Sunday, July 3, 2011
Sawdust-n-Sails


So I finished cutting and planing the chines and the last little bit on the gunwales. I sorted through a bunch of other lumber and pulled out what I'll be using for the bulkhead perimeters, stems, seat supports and the like. Will be using a bunch of cutoff pieces from when we installed our floor. It's all 3/4" x 4" mixed hardwood tongue and groove flooring cutoffs, including stuff like kwila (ironwood), mahogany, and other standard hardwoods found here in Papua New Guinea. I tried to divvy them up so that the hardest stuff (ie. kwila) is to be used for the ama struts and the sides of the bulkhead perimeters where the bolts will be passing through. Then I'll want the lighter weight stuff to be used in all the other places.
Still haven't determined what I'll use for the iakos. Actually contemplating using bamboo, but I remember reading that Gary Dierking's concern with using those is that unless a way is found to provide structural support at the lashing points, that may be a major weakness. The walls of bamboo can be prone to crushing under such strain as the iakos experience. Will have to think about that and also experiment with bending the bamboo. I'm perfectly happy to do the either the laminated solid iakos or the hollow box frame construction like in Gary's book, but it seems that bamboo would be the lightest option if it would be strong enough at the lashing points and formable enough to get the downward curve at the ends.
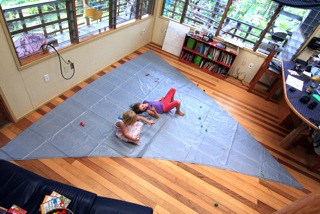
I also managed yesterday afternoon to cut the sail out of my tarp material. Moved all the furniture out of the living area in our house. The kids were around then and thought it was a blast! So we laid out the sail, cut it, and even sewed the leech seam as well as a single dart in the foot and one in the tack (for the equivalent of the broad seam).
One thing I'm very concerned about at this point, and would LOVE to get some feedback on before proceeding any further) is whether or not sewing is the best option on this tarp. This polytarp is not of the woven variety. It's a solid piece of plastic. Same material, just not woven. Well my fear has been that sewing the unwoven stuff would actually serve only to act as a perforation line, making for a weak spot in the sail where it will be likely to tear. Well on my test pieces, I'm finding that to be true. It takes quite a bit of pulling to make it happen, but it does tear right along the stitches. It does require strong pulling for it to tear, but it always tears along the stitch. One thing I'm thinking about (assuming I decide to keep this material for the sail) is taping over all the seams as a backup, using either duct tape or packing tape. But I really would like for this sail to look nice if possible. Any ideas or thoughts out there? I need some help figuring out what the best long term solution will be here! If you have thoughts, post your comments!
Subscribe to:
Posts (Atom)