On one of the three paddle handles I molded, I was able to get one totally glued up with the blade. This morning I did an extra good sharpening on my hand plane and went to work. I'm pretty happy with how the whole thing turned out. Yeah, I know I said I was going to do a variation of one of Tim Anderson's quick paddles, but ended up deciding that with all the time I have between now and the maiden voyage, I'd like to try to glue things up proper. I might do a quick paddle for the fourth just to have some variation to play with. One other thing is that I planed the blade thin enough that I'm worried about the glue joints splitting. So I'm thinking of making several 'bowtie' inlays on either side, spanning the joints which should add quite a bit of structural strength. The other option I'm contemplating is to just maybe slap some fiberglass over the tip of the blade.
So the whole thing, unfinished, and without the topmost handle piece weighs exactly 2 lbs (32 oz). Not sure how that compares with other paddles out there, but it feels light to me. And if you're interested in knowing, the blade is made of what I believe to be rosewood, a very commonly available wood here in Papua New Guinea.
Saturday, September 8, 2012
Sunday, September 2, 2012
Hiking Seats and Paddle Genesis
(Okay, this is getting ridiculous. Can't seem to get my email out intact... We need internet out here in the bush!!!!!)
Finally put the hiking seats together. Actually kind of piddled away at them in the evenings throughout the week. I decided to deviate from Gary's design (something I've done sparingly on this build) and go with webbing for the hiking seats. I've got a bony rear end and the thought of sitting on wooden seats doesn't appeal to me if I can avoid it. These are comfy cozy! In addition I'm sure they're lighter too. Anywhere where a little bit of effort can save a good deal of weight is a good way to go. I cut the frame out of teak. Teak has it's own nice preservative oil in it (which gums up saw and planer blades, by the way) which is why I skipped varnishing. I figured this stuff will weather nicely without any treatment.
Then this morning (sat) I milled up some old dried bamboo I have sitting around. Just enough to get some strips about 7/8" wide. I wanted this for making my bent shaft paddles. I'm hoping to make a variation of Tim Anderson's instant paddle. Just going to try to make it with the bent shaft. The plan is (mostly based on a guess) to make it a bit of a stretched out version of what one typically sees on the bent shaft paddles. My guess is that because I'm sitting up higher above the water than I would on one of those OC's that my paddles will need the appropriate adjusting. Bent portion up high enough that it does what it's supposed to do in relieving tension on the lower hand. The blade is also stretched a bit at about 15". Then the angle of the blade will be 8-9 deg instead of 10. I realize I may have absolutely no idea what I'm talking about. I'm just gleaning info from the little tiny bit I've downloaded from the internet for reading here in the bush. Otherwise I have no resources that talk much about paddle design. I may end up making one of these and throwing it away because it sucks. Anyway, today I decided to try my hand at milling bamboo for the shaft. Bamboo is so light and strong I figured it may make for a great, lightweight handle. Once the glue dries I'll test it out under some pressure and torsion and see what it feels like before continuing with it. If it feels strong enough I'll make the other handles (going for three total) and then move on to the blades.
Oh yeah, in other news, I've scheduled Shan Skailyn's maiden voyage up the coast for March 18th. It's a long way off, but logistics require it. It's mostly because of so many months between now and then that I decided to goof around with the fancy bent shaft paddles instead of something much simpler. Why not, right?!
Finally put the hiking seats together. Actually kind of piddled away at them in the evenings throughout the week. I decided to deviate from Gary's design (something I've done sparingly on this build) and go with webbing for the hiking seats. I've got a bony rear end and the thought of sitting on wooden seats doesn't appeal to me if I can avoid it. These are comfy cozy! In addition I'm sure they're lighter too. Anywhere where a little bit of effort can save a good deal of weight is a good way to go. I cut the frame out of teak. Teak has it's own nice preservative oil in it (which gums up saw and planer blades, by the way) which is why I skipped varnishing. I figured this stuff will weather nicely without any treatment.
Then this morning (sat) I milled up some old dried bamboo I have sitting around. Just enough to get some strips about 7/8" wide. I wanted this for making my bent shaft paddles. I'm hoping to make a variation of Tim Anderson's instant paddle. Just going to try to make it with the bent shaft. The plan is (mostly based on a guess) to make it a bit of a stretched out version of what one typically sees on the bent shaft paddles. My guess is that because I'm sitting up higher above the water than I would on one of those OC's that my paddles will need the appropriate adjusting. Bent portion up high enough that it does what it's supposed to do in relieving tension on the lower hand. The blade is also stretched a bit at about 15". Then the angle of the blade will be 8-9 deg instead of 10. I realize I may have absolutely no idea what I'm talking about. I'm just gleaning info from the little tiny bit I've downloaded from the internet for reading here in the bush. Otherwise I have no resources that talk much about paddle design. I may end up making one of these and throwing it away because it sucks. Anyway, today I decided to try my hand at milling bamboo for the shaft. Bamboo is so light and strong I figured it may make for a great, lightweight handle. Once the glue dries I'll test it out under some pressure and torsion and see what it feels like before continuing with it. If it feels strong enough I'll make the other handles (going for three total) and then move on to the blades.
Oh yeah, in other news, I've scheduled Shan Skailyn's maiden voyage up the coast for March 18th. It's a long way off, but logistics require it. It's mostly because of so many months between now and then that I decided to goof around with the fancy bent shaft paddles instead of something much simpler. Why not, right?!
Thursday, August 30, 2012
Mast and Boom Assembly
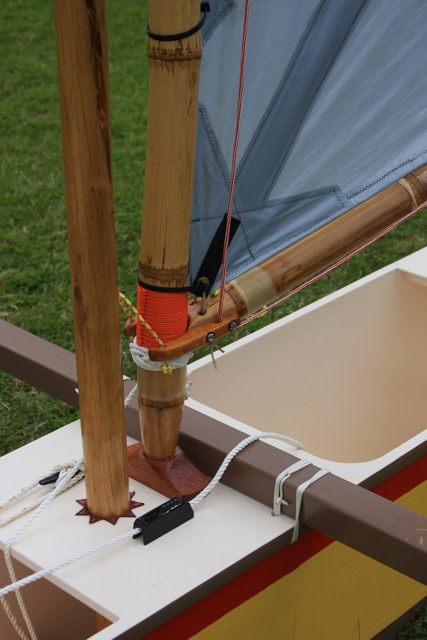
Here are some pictures of Shan Skailyn's stub mast and luff spar all assembled last weekend. As you can see, I still have some loose ends to tie up. Some of it depends on whatever reefing system I settle on. My original plan to reef by lowering the sail has proven to be problematic. Not impossible, just requiring more gear than I have at the moment.
Note the two cleats on either side of the stub mast. The one on the right in the picture is for the halyard, so I can quickly release in case things feel out of control (necessary for this unexperienced wanna-be sailor). The other cleat is for the rope that keeps the luff spar tensioned in it's universal joint.
Saturday, August 25, 2012
Raise the Sail
Ugghhh, our email system keeps butching my emails... Trying again
Today was an exciting day! For the first time ever I got to see how Shan Skailyn's rigging is all going to work out. Raise that sail!
Friday, August 24, 2012
Thursday, August 23, 2012
Stub mast retainer
(Gonna try to post this again. Yesterday's post got screwed up by our funky email system)
Slowly putting together pictures of little tidbits I've done on Shan Skailyn here and there.
This is the mechanism I made to keep the stub mast in place in case of capsize. It's just a little stainless steel tongue. Only way to remove the stub mast is by depressing the tongue prior to sliding out of the step. The other picture is the deck level mast steps. One for the stub mast (with leather collar just to keep the mast from knocking around) and below it, the universal joint (where the luff spar will sit). Everything seems to fit and hold really well.
Slowly putting together pictures of little tidbits I've done on Shan Skailyn here and there.
This is the mechanism I made to keep the stub mast in place in case of capsize. It's just a little stainless steel tongue. Only way to remove the stub mast is by depressing the tongue prior to sliding out of the step. The other picture is the deck level mast steps. One for the stub mast (with leather collar just to keep the mast from knocking around) and below it, the universal joint (where the luff spar will sit). Everything seems to fit and hold really well.
Subscribe to:
Posts (Atom)