OK, took a few minutes today during lunch to weigh up the individual hull sections as they are right now. Other than the mast step, glass and paint, there really isn't much that will add significant weight at this point. So these numbers are probably pretty close to what she'll end up weighing.
Fore section - 19.5 kgs (~ 43 lbs)
Mid section - 21.5 kgs (~ 47.5 lbs)
Aft section - 19 kgs (~ 41.5 lbs)
TOTAL 60 kgs (~ 132.5 lbs)
That's not too bad, is it? Considering what's left (sail, rigging, ama, hollow beam iakos, etc) I would guess loosely that I'll easily tack on another 40 kgs. That would put the completed Shan Skailyn at around 100kgs (~ 220 lbs). But that's just guessing there.
Tuesday, October 25, 2011
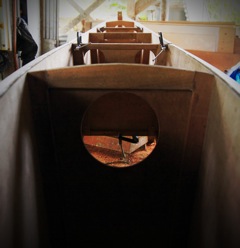
Hull nearly completed
(Once again, our fantastic system for emails managed to destroy my original email message, breaking it into pieces and unable to put it together again. Here's the text that was supposed to accompany those last 4 pix.)
I thought the cutting and installation of the seats was going to be quicker. But that's about all I completed today. Still good though. Another great step toward getting her done. I also installed the filler strip over the gunwales to bring everything level with the seats. Once the epoxy is cured I'll use the router to clean up the edges (I glued everything slightly oversized) and sand it down.
For the strip over the gunwales I chose to go with a hardwood, thinking it would eventually save on wear and tear over the other option which would have been to use scraps of the 1/4" plywood that is left over. Also, when it comes to lashing the iakos over the gunwale when set up as a 16 footer, I would imagine I'll be happy it's all hardwood there. I noticed on Gary's boat that he has little metal covers over that area, I would imagine for the same reason.
Also, maybe I'm just a dunce and couldn't figure it out from the plans, but the three seats that Gary's plans show on the plywood cut outs don't seem like enough to take care of the needs of the 24' version he shows in the drawings. So what I opted for was to take the foremost seat (the one the mast passes through) as well as the aft most seat and make them out of some 3/4" ply I had sitting around. I dado'd the edges so they are recessed down and are level with the rest of the seats at 1/4" above the gunwale. I would imagine this setup is going to work quite well, though I'm sure I am paying a bit more price in weight.
Speaking of weight, I can't wait to see how much the entire hull weighs. Probably need to wait until it's all glassed and painted first. But knowing me, I probably won't be able to wait that long. Will weigh them soon I'm sure.
One more little tidbit that might be helpful for any other boatbuilders-to-be out there. If you're planning on using the bronze ring shank nails, you'll want about 900 of them just to be sure. I've kept running out because I shorted myself early on. By the time I'm all done, I'll probably have used at least 700. But I wish I'd put twice as many in certain areas along the chine and gunwales. I think I over-skimped there putting a paltry 1 nail per foot... sorry, I can't remember what all I ordered or I'd have a more accurate number.
2011_10_5633.jpeg

File Name: 2011_10_5633.jpeg
2011_10_5635.jpeg

File Name: 2011_10_5635.jpeg
2011_10_5634.jpeg

File Name: 2011_10_5634.jpeg
2011_10_5612.jpeg

File Name: 2011_10_5612.jpeg
Tuesday, October 18, 2011
Checking alignment

I'm a bit frustrated that the wrong hex nuts were sent with my bolts. All I can do now is put the bolts through and clamp the thing together across the top of the bulkheads. Definitely don't want to do any moving around of the hull when it's together like that or the strain is likely to break something. I want my bolts! Next chance to get the right nuts won't be till after the new year sometime, as late as Feb or March when we go back to the US for the delivery of the new member of our family.
But I'm happy to say that all the joints are lined up nearly perfect. There will be very little, if any, sanding and filling to match the joints up.
Monday, October 17, 2011
Glued up hull
(You'll have to pardon the last couple posts. Our email system tends to mess things up frequently. Unfortunately I can't get online to fix it either! So here's the text that was supposed to go with the pix)
I managed to get a really good amount done on Shan Skailyn yesterday. All three hull pieces are now glued up, including the bottom panels. I filleted all around the watertight bulkheads. I installed both false stem pieces. Then on one of the end hull sections I managed to sink all the bronze nail heads, fill with epoxy paste, shape the stem (probably will need to work it a bit more so it's not so rectangular looking), sand down excess filling over the nail heads and put a 1/4" round over all around the bottom for when I eventually glass the bottom. Oh yeah, I also put a couple quick, heavy coats of varnish on the inside of the watertight compartment. And one more thing, I made the pattern for the covering over the watertight compartment. WHEW!
I still need to put all the sections together and fair it up, but if my dry fit test was any indication there shouldn't be much that needs to happen there. Unfortunately that will probably just have to wait till next weekend. I'm just out of time this weekend.
I'm quite pleased with how it's all coming together. Unbelievable how much work all this is! But it's going to be so much fun to take the family out on over the years when we're out in town on our breaks.
In other news, we found out recently that we're getting a surprise visit by the stork sometime late April! Our fourth child! Pretty exciting stuff! It does mean a change of plans though. Since Shannon has complicated pregnancies and deliveries and since here in Papua New Guinea there really aren't adequate medical facilities to handle things, we're going to be returning back to the states sometime early next year for about 4 months to have the baby. Not sure what this will do to Shan Skailyn's maiden voyage, but I'm sure it will knock it back a little bit. Anyway, there will be a pause in my posting about that time.
2011_10_5540.jpeg

File Name: 2011_10_5540.jpeg
2011_10_5534.jpeg

File Name: 2011_10_5534.jpeg
2011_10_5538.jpeg

File Name: 2011_10_5538.jpeg
2011_10_5540.jpeg

File Name: 2011_10_5540.jpeg
2011_10_5521.jpeg

File Name: 2011_10_5521.jpeg
Saturday, October 15, 2011
Finished leeboard and rudder


Bob from Arkansas, any thoughts on that?
Response to comment
Hey Bob from Arkansas, great info! Thanks a ton! A blacksmith, eh? I've been emailing Gary on occasion with my questions. Yes, he's always great to respond with helpful info. I'm trying not to bug him too much though! But he does seem happy to help when he can.
I'm curious what the wall thickness of the bamboo you use is. We've got some stuff here that is really thick walled. It's usually dried in the sun and doesn't crack unless you leave it out for a year or so. When it's dry, it's extremely lightweight and more rigid than an equal size diameter hardwood timber. The stuff I have drying now is just a bit bigger diameter than Gary recommends in his book (that should answer your other question about the book or the plans, BTW) but I'm thinking I'm going to give it a try anyway.
Stay tuned. I've had a busy week so haven't had the time to take and post pix of my final rudder and leeboard. I'm really pleased with how the rudder assembly turned out. It's got nice smooth action with just a small tolerance, seems like it's going to be really strong, and looks halfway decent. I sure used up some of my saw blades and drill bits cutting and shaping that stuff though! Wish I'd known about the cold chisel thing back then!
So, you're a blacksmith, eh? I'll have to keep you in mind sometime with some of the other practical projects I that are so inevitable around here.
Hey, any idea how I can drill a small hole through the end of a 1/4" diameter stainless steel shaft? I want to put cotter pin through it, but have only managed to bind up and break my small drill bits. Any ideas? I first hammered the end flat to make it a bit easier to drill through. Helped, but still no go! That's hard stuff!
(You'll have to pardon my method of responding here. No internet from out here in the bush. But I can generate new posts via email. So welcome to my way of responding to comments!)
Friday, October 14, 2011
Response to comment
Hey Bob from Arkansas, great info! Thanks a ton! A blacksmith, eh? I've been emailing Gary on occasion with my questions. Yes, he's always great to respond with helpful info. I'm trying not to bug him too much though! But he does seem happy to help when he can.
I'm curious what the wall thickness of the bamboo you use is. We've got some stuff here that is really thick walled. It's usually dried in the sun and doesn't crack unless you leave it out for a year or so. When it's dry, it's extremely lightweight and more rigid than an equal size diameter hardwood timber. The stuff I have drying now is just a bit bigger diameter than Gary recommends in his book (that should answer your other question about the book or the plans, BTW) but I'm thinking I'm going to give it a try anyway.
Stay tuned. I've had a busy week so haven't had the time to take and post pix of my final rudder and leeboard. I'm really pleased with how the rudder assembly turned out. It's got nice smooth action with just a small tolerance, seems like it's going to be really strong, and looks halfway decent. I sure used up some of my saw blades and drill bits cutting and shaping that stuff though! Wish I'd known about the cold chisel thing back then!
So, you're a blacksmith, eh? I'll have to keep you in mind sometime with some of the other practical projects I that are so inevitable around here.
Hey, any idea how I can drill a small hole through the end of a 1/4" diameter stainless steel shaft? I want to put cotter pin through it, but have only managed to bind up and break my small drill bits. Any ideas? I first hammered the end flat to make it a bit easier to drill through. Helped, but still no go! That's hard stuff!
(You'll have to pardon my method of responding here. No internet from out here in the bush. But I can generate new posts via email. So welcome to my way of responding to comments!)
Saturday, October 8, 2011
Hull Assembly


I know I've already said this, but 24' is one big canoe! You don't realize it till it's together! I'm starting to wonder how I'm going to have to rearrange things when I'm working on it as one entire hull.
After checking it all, I managed to glue up both end sections. I might manage to be able to fillet the watertight bulkheads in place if I have a bit more time tomorrow afternoon (sunday).
Oh yeah, I got the sixth and final coat of varnish on her leeboard and rudder. Decided to go with what may be overkill with 5 thick coats (sanded in between each coat) and 1 thin final coat. I don't know of any 'spar' varnish available in country here, so I'm just using the next best thing; exterior varnish. Hopefully the many coats with a good sanding between each coat will give me a nice long lasting protective coat. That pretty much finishes things up on the leeboard and rudder now. Hardware is all done. Woodwork and finish is all done. Pix forthcoming.
Monday, October 3, 2011
Strange Trimaran in Madang, PNG


It has two amas. The amas are made of bamboo lashed together. It looks as if there is actually a lower ama (see picture) and an upper ama. The lower one looks like just a single piece of bamboo maybe. It's suspended below the much beefier main ama. I would guess that this is so that the main ama isn't always creating so much drag in the water; the lower, simpler ama giving just a touch of stability to the ship until it needs more. Not sure though. Note too the curvature of the ama. Though not as easily visible on the other side, they both have about the same curvature built in.
Then on the iakos (they're huge!) are stored a bunch of these little wooden boats. Even these little wooden boats are a style that looks different than anything I've ever seen before.
This boat just sticks out as different... and it's an outrigger (though not a sailing boat) and so I thought I'd post some pix here and see if anyone has ever seen or knows about anything like this? What is the purpose of this boat with all it's little boats?
The other picture was just a nice shot I got of some kids out on the family dugout.
Just a few more days until we go back into the bush. We've been out way too long. As well as looking forward to seeing my friends and talking about some exciting things regarding the church in Mibu, I'm looking forward to getting some little bits of time here and there to work on Shan Skailyn.
Subscribe to:
Posts (Atom)