Thursday, December 27, 2012

It All Adds Up!

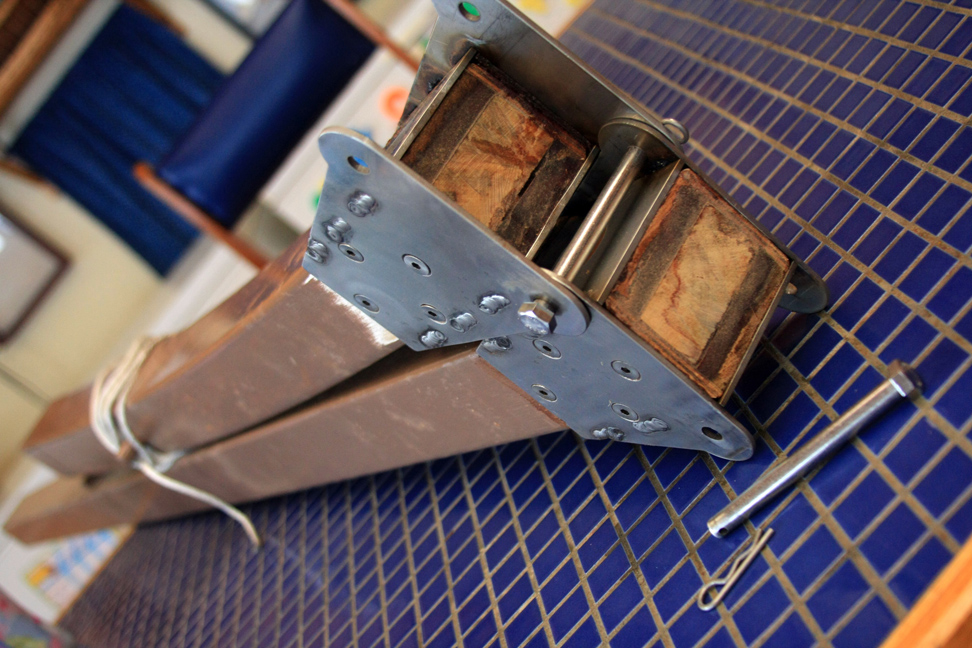
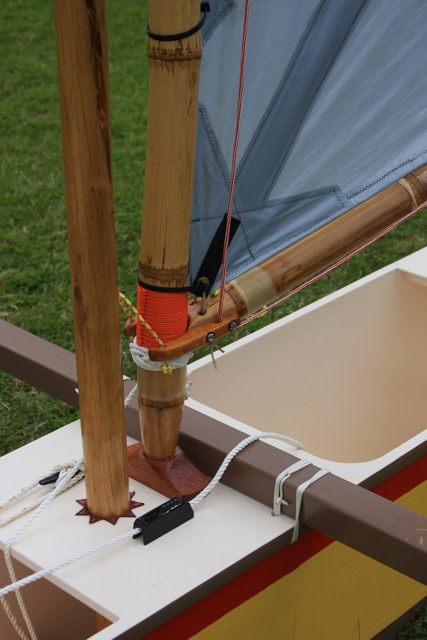
It always amazing to me just how the combined weights of the little things add up! It was about a year ago that I last weighed all the individual components as they were then. Weighing them again now I'm finding that much like many of us as we celebrate Christmas, they've all put on weight! The completely rigged Shan Skailyn is 35.9 kgs heavier than what Gary Dierking specifies in his book. I'm not sure how I feel about that. As I ask where the weight comes from, it's not peanut butter truffles and candy canes, though that may be what did it to me. A great deal of it comes from the accumulated weight of contingencies and other little accoutrements deemed necessary, along with the fact that many of those were made from the only kinds of wood available to me, the heavier, more dense stuff. Wherever I could, I went with the lightest material I could find. But I think now I'm seeing just how much all that adds up. And of course those stainless steel crossbeam hinges didn't help, though the additional weight is a small expense to pay for the added benefit. Over time, as I find the urge to replace certain parts, I'll definitely be doing what I can to get materials that are lighter weight. I can see remaking the leeboard, stub mast, and maybe even ditching the steering oar (or remaking it if I find myself using it enough. And then there are some little pieces that would be easy enough to remake using lighter material with little consequence to my time. For now, for me, it matters not. I'm super pleased with my boat and can't wait to get it out and sail it! Just a couple months till the maiden voyage!

Fore hull section 23.0 kgs (50.7 lbs)
Mid hull section 23.7 kgs (52.2 lbs)
Aft hull section 23.5 kgs (51.8 lbs)
Aft iako 9.8 kgs (21.6 lbs)
Fore iako 9.8 kgs (21.6 lbs)
Ama 14.2 kgs (31.3 lbs)
Sail + spars + rigging 15.0 kgs (33.0 lbs)
Stub mast 5.5 kgs (12.1 lbs)
Steering oar 3.6 kgs (7.9 lbs)
Rudder + tiller + hardware 3.6 kgs (7.9 lbs)
Leeboard + hardware 6.5 kgs (14.3 lbs)
Motor mount 3.0 kgs (6.6 lbs)
2 seats + support pola 7.5 kgs (16.5 lbs)
2 seats + support pola 7 kgs (15.4 lbs)
2 small polas 5.2 kgs (11.5 lbs)
----------------------------------------------------------------------
TOTAL WEIGHT (fully rigged) 160.9 kgs (354.7 lbs)

I'm not sure how Shan Skailyn's weight holds up to others' builds. Anyone care to comment? What kinds of total rigged weights are we seeing out there?

Tuesday, December 18, 2012

Dig the Rig

As I've looked around online (when I'm out in town obviously) I've struggled to find good details of different folks' reefing solutions. So here is my potentially lame attempt to put it all together. Not that Shan Skailyn's rig is the best example or anything. But wherever it fits on the scale of good-bad, here are pictures of the details. I would just post all the pix separate, but our limited email system cannot handle that many attachments. So I'm combining in one larger picture. You'll have to forgive my possible skewing of terminology. In many cases I'm just being descriptive without actually knowing what everything is called.

Monday, December 17, 2012

Behold the Fold

This weekend was the first time I've been able to assemble Shan Skailyn since I installed its hefty iako hinges some time ago. Works like a charm! That'll come in super handy.

Thought I'd throw in a picture of my 'land crew'; youngsters from the area who were all too pleased to help with the assembly process. Note the reefed sail. I've got the sail and rigging completely done now. The whole thing can be reefed in just a few minutes with relative ease. Same for the reverse.

This composite photo is my attempt to overcome the difficulties of sending pictures over email. Our HF radio system doesn't handle multiple pictures well. So maybe it'll handle this better.

Sunday, December 9, 2012

Reefy Reeferson!

I'm feeling pretty stoked after the work I was able to get done yesterday (sat). Finally managed to get the sail to a point where it can be reefed out on the water! The solution was in the use of parrel beads at key points as well as the installation of a sheave for a clew outhaul. Altogether I can now reef with the entire rig remaining upright. Still takes a little finessing, but it does work. I think I'll throw in a couple more parrels add some ease to the procedure and call it good. As it stands right now, I have to release clew outhaul, release the halyard (for the head of the sail... what's that called anyway?), take up the weight of the boom and 'jiggle' the sail down the mast, which takes a few minutes to get all the mast hoops to work down and over the bamboo joints. Once that's done, I can attach the reefing hook at the tack, which is actually just a stainless carabiner, tighten up the reefing line that pulls the new clew down into place, and tighten up the main clew. Then just tie up the cringles or whatever those little rope thingies are supposed to be called, and we're good to go. Probably sounds more complicated than it needs to be, but I figure for a setup using more traditional materials it's probably about as good as it's gonna get. I'm quite pleased with it. Though it has yet to be tested in a real situation.

Just FYI, this system reefs 25" of the foot of the sail, which is very nearly, if not a perfect, 1/3 of the total sail area, or about 27.7 square feet.

One thing I've noticed is that finding good pictures of all the details of a system's rigging have been hard to find (when I actually have access to internet in town, that is). If I can scrounge up the time, I'm hoping to put together some pictures of details of the rigging.

Tuesday, December 4, 2012

Reefing Conundrum

My focus this weekend was on getting a good start on modifying the boom and sail so that I can reef the thing. I ran into problems with my original reefing plan, where the luff edge did not want to slide down the bamboo mast. Adding to the complications is the attachment of a halyard about 1/3 of the way up the mast, past which one of the mast hoops has to go down. I've since come to realize there are a few key points that keep this sail from lowering. One is the brailing line attachment point up on the luff spar. The pulley is integrated into the mast hoop via a quick eye in the rope. The pull of the weight of the boom is just enough to make for a lot of friction as the hoop tries to pass over the joint in the bamboo (BTW the joint is called 'gwudukngu' here in the Mibu language. Same word is used for elbow. Bamboo is called 'kekngu', the bamboo joint is called 'kekngu gwudukngu'.) OK, back from our rabbit trail. The other biggie is the clew attachment. Right now the clew is attached via static connection. Because of the angles in the sail, when the luff is lowered down the mast, the clew needs to pull in toward the mast. So I had to modify the end of the boom to incorporate a sheave. Now I have a clew outhaul... well almost. I wasn't able to get it completely done. When I am done though, I'll uncleat the clew outhaul, let it loose a bit, then lower the sail to its reefing points and tighten up the clew again. Note in the picture that I've simply added an extension on to my original bamboo plug into which I was able to make a slot for the sheave. I tenoned the new piece into the original, then drilled out and doweled through the whole thing, locking it into place for what I hope will be a really strong joint.

Because of the other friction problems, I've decided that a few spots need parrels. I looked high and low when I was in town last and could not find any suitable beads for the job. So I made my own out of some very dense, strong wood called 'kwila' which from what I understand is ironwood. So far, it looks like parrel beads at the head, the clew, and at the brailing line attachment point on the luff, will all serve their purpose well. Hoping I don't need any more than that to make it work.

I stewed and stewed about just how to go about making these parrel beads. Then it hit me! A small hole saw in the end grain of a piece of timber, then cross cut with the table saw. Then thread each one on a long bolt and work the things into shape with the orbital sander. Worked out pretty nice. I used similar methods to make my sheave as well.

No, I'm not into some kind of all natural funk or anything like that. Remember, I live in the middle of the jungle. No home depot, no Lowe's, no nothing. I would just order whatever I find lacking next time I'm out in town, except since it usually takes several months for me to get things I've ordered, and since the maiden voyage is coming up soon, in March, I have to make do with what I have. The added benefit is that I'm saving money this way too. Those parrel beads are expensive to buy online!

Will post pix of the finished assembly when everything is finished, which by the looks of it, may be a couple weeks. Got a lot going on that is limiting time spent on extracurricular activities.

Anchoring the Anchor

Wouldn't it be nice if I had internet access and could just include all the pictures and their descriptions in just one nice post? One can only dream. But as it is, I'll try to find contentment in posting all this over my limited HF radio connection.

So, the anchor. Yeah, really interesting right? As such I'll keep it short. I bought an anchor when I was out in town last. I didn't like the idea of the thing sliding around and not having a place of it's own in the boat; something solid would be needed that would keep it from falling out in the event of a capsize, or otherwise banging around making a bunch of racket, or worse, doing damage to the plywood hull. So I whipped up this little contraption which seems like it'll work out nicely. It keeps the anchor nicely stowed, out of the way, where the stub mast is stepped, under the seat there. The bottom end of the anchor, where the chain attaches, is held in place by a rare earth magnet, extracted from an old hard drive. I use those magnets for tons of things! Glad I found a spot for one on Shan Skailyn.

Sunday, December 2, 2012

Railyn On Skailyn

Last Saturday I worked on some lashing rails. They're meant to be mounted on the inside of the gunwale in the fore and aft sections of Shan Skailyn. The idea is to have some handy spots to lash and tie things to. They're all done now, though unfortunately, I've come to realize I don't have any proper size screws to mount them! I just ordered some and thankfully the helicopter is scheduled to bring some food in to us (remember, we live in the middle of the jungle here) in just a couple weeks, so I won't have to wait too long.

In front of the rails in the picture, are two odd looking pieces I made up as a way to mount my anchor, which I bought a couple months ago when we were out in town last. More on that in the next post. Gonna have to catch you up on a series of smaller details in the next few posts.

Monday, November 19, 2012

Finished Oar

Once again, I found myself limited to just a few hours of work on Shan Skailyn this last weekend. Is it me, or do things just keep getting more and more busy? No problem. Just plug away when you can and it'll eventually get all done.

I managed to finish the steering oar. Turned out pretty nice, though I do wonder about it's flexibility, if it may be too much. Oh well. I'll leave that up to future experience to tell me. Again, this is a backup steering/propulsion system. I simply modeled after the diagram in Gary's book. Went with the 10' version. Total weight is 3.6 kgs (7.9 lbs). Seems a bit heavy to me. Though I'm not sure what one might expect from a 10' oar weight wise. Only thing left on the oar at this point is to put the 2nd, 3rd, and 4th coats of exterior varnish on the oar. Also note the texture I put on the handle (see picture in previous botched post). My thinking was that it would provide better grip in wet conditions. I'm wondering if it might only serve to expedite the development of blisters. Hmmm. If it does, I can just wrap inner tube strips around it for comfort. Hmmm. Why didn't I just do that in the first place?!

One other thing I did on Saturday morning was to varnish the underside of the fore and aft decks. This is something I neglected to do initially, thinking it wouldn't be a problem to just leave the plywood bare on the deck since it's in a sealed compartment. However, as I've thought over things, I've come to realize that my original thinking was naive. In a water craft, I think one can assume everything will get wet at one point or another. Best to leave zero surfaces unfinished if I want to extend the life of the material. So I got that done. Not an easy job on an assembled boat. I had to assemble the fore and aft pieces and turn it upside down on a table so I could sit up inside the hull and reach my arms inside the sealed compartments and apply the varnish all the way to the stem. Now I know why I've delayed doing that. All that work and it feels like I didn't really accomplish anything meaningful, at least not anything perceivable. But I do rest better knowing I've taken a good step toward preserving Shan Skailyn. After reading Chris Grill's blog (grillabongquixotic.wordpress.com - gotta check it out if you haven't already) and seeing what happened to his deck, I'm taking whatever measures I can to keep this one intact as long as possible. Of course his boat, Desesperado, has been in the water nonstop for more than a year, not to mention it's a completely different construction method and material. But the principle is the same... water eventually rots wood. Thus it is a good idea to do what you can to keep the water off the wood.

2012_11_9537.jpeg

The attached file was originally sent with another message.

File Name: 2012_11_9537.jpeg

Saturday, November 10, 2012

Paddles and Oar

Today didn't feel like I got much done on Shan Skailyn. I'm mostly working on all the peripheral stuff these days. Anyway, I managed to get a second paddle done. I really like the wood used for the blade on this most recent one (the lighter colored one in the picture). It's much lighter and straight grained than the other stuff I used. The other one looks like rosewood, but feels too light to be rosewood. The other stuff was a major pain to plane down because of the irregular grain. I will definitely be making the third paddle out of this lighter weight straight grained stuff.

I also laminated up some strips which will eventually be the oar paddle. I'm planning on having the oar, mostly as a back up in case the rudder fails. Not sure what length will be needed. Gary recommends 8' to 10' oars for his boats, or "generally half the length of the boat". So I went ahead and made a 10' long oar handle. You can always make it short, but not longer. It seems like I chose a fairly heavy wood for this handle. Not sure how I feel about that. At this point I don't have a whole lot to choose from, especially when I'm looking for 10' length. I could have made it all from one solid piece, but the wood I have isn't quarter sawn or anything special that will make it more stable. Often, once you cut into this stuff it bends on you. So I cut strips out of the same piece, alternated the grain direction between each piece and laminated it that way. Should be much more stable, and much stiffer that way. Not sure how thick of a handle I'm going to make. Gary's book shows as thick as 1-13/16". Since this is a heavier wood, I'm kind of thinking of going closer to 1-1/2" to cut down on weight, and hoping the wood is strong enough... no clue on the type of wood, by the way. I have a 2-1/4" brass oarlock on the way for which I don't want to undersize the handle too much. One downside to laminating 5 strips together is that it uses a lot of glue! I think I used nearly a quarter bottle of titebond III. Yeah, that's what I'm using for the paddles and other peripherals... hardly have any epoxy left and no moolah in the budget for more. So I'm saving what I have just in case I need to glass a bit more or glue something that is actually part of the boat.

Monday, November 5, 2012

Shan's Tiller

Having just come back in to the bush from being in town for a while, I didn't have a lot of time this weekend for anything but laundry, laundry, and more laundry... oh yeah, and unpacking boxes and boxes of food and trying to organize it all. Imagine only getting a grocery run every 2-4 months.

But I did manage to get some little bits here and there, during which I managed to glue up one more paddle blade, and even better, construct the tiller for Shan Skailyn's rudder. I was concerned about using a bolt at the pivot point (at the base of the tiller) for fear that the thing might work itself loose. Since I still have some leftover brass rod, and some loose stainless steel washers and retaining pins, I decided to rig something up with that. My only concern with the retaining clips is that they're yet another little pointy, grabby thing that a rope is bound to snag. We'll deal with than when it becomes necessary.

For the paddle blade, I'm not sure what kind of wood I'm using. It's the same stuff that the Mibu folks use for making siding for their huts. It's very very lightweight, long grained wood. Hope it's strong enough for a paddle blade.

Wednesday, October 31, 2012

Fighting Outrigger Canoe

One of my buddies here in Madang, Papua New Guinea, who travels around to a lot of out of reach places here, was given this model outrigger by people of Wuvulu island. The model is of a war canoe. They no longer make them like this, but their ancestors used to. Unfortunately my friend did not get any more information than that. Very interesting design though!

Anyone ever seen anything like this? Got any additional information to add?

Hmmm... a quick search on google shows a number of mentions of these canoes. Here's a clip from the following site http://www.janesoceania.com/oceania_arts1/index.htm

Canoes were honored above all other objects and frequently invested with religious symbolism, and among some Micronesian population their construction was the prerogative of high-ranking members of society. With their deep hulls, large triangular sails and sides painted sometimes in the solemnly religious colours of red and black, all united by a rare purity of line, these vessels were created not merely as a means of transport over the ocean but also as a source of communal pride. At Truk (Chuuk) the great war canoes known as wa faten were equipped with detachable carvings in the form of birds with tails spread and beaks facing each other. Far from being purely decorative, these embellishments to the prow and stern served to broadcast the intentions of the canoe's occupants: peaceful if the figures were in the low position, warlike if held high.

Wednesday, October 24, 2012

Maiden Voyage Shaping Up

I've taken advantage of the time out in Madang town to ask around and try to ascertain what the weather/sea conditions will be like in March when we're scheduled to embark on Shan Skailyn's maiden voyage. I've asked locals and expats alike. I spoke to a guy named Makka at the Madang Game Fishing Club who said at that time frame the sea should be really nice. One down side is that the wind may be a bit on the weak side. I guess that's why I'm making paddles! Makka has lived and boated here for over 40 years and seems to know his stuff. He mentioned that the fishing should be pretty easy out there too.

My excitement about this trip is growing. I recently put together a fly through using googlearth and have been able to virtually fly over the whole length of the coast we intend to sail. Also, when we flew out recently we flew the entire length of the coast in the helicopter. Several things that stick out to me are that there doesn't seem to be anywhere that will be difficult to land the boat except for one mile long stretch right at the town of Madang where it's all rocky. But everywhere else, there are landing sites and villages pretty evenly dispersed. The total length of the trip is about 87 miles, revised from my original estimated 70. We figure conservatively that if we're averaging 4mph about 5 hours each day, that we can get from Wab (close to Saidor) to Madang in just under 5 days.

Note in the picture that this is a birds eye view of the location where we intend to fly Shan Skailyn down to in the helicopter. From there, we'll get it all rigged up and get moving.

Sunday, October 7, 2012

Duckworks

I just thought I should take the time to mention in a post the absolutely awesome service that I've seen again and again from Duckworks Boat Builder's Supply. Again and again they have accommodated me in my remote and far-off situation (living in the jungle, on the other side of the world, with no internet access). Their service and willingness to help has been so key in the building of Shan Skailyn. They are a great one-stop shop for small boat builders! Be sure to check them out at http://www.duckworksbbs.com/

Sunday, September 16, 2012

Motor/Rudder Mounting Bracket

So here's a picture of the motor/rudder mounting bracket as it is currently. Actually, I made this several months back when back in the U.S. and then brought it back with me in my luggage. One thing I noticed working with plywood in the states is that I'm grateful for the really really good quality plywood that is available here in Papua New Guinea. The stuff I've messed with in the states delaminates so easily. So back from the rabbit trail... Note the construction of the bracket varies a bit from what Gary shows in his book. Instead of a flat top and stainless steel bracket with bolts, I figured I'd build the sides up so that they fit snug around the crossbeam. Then all that's needed is a good lashing and the thing isn't going anywhere. Works pretty good and kept me from having to buy more stainless steel stuff. I don't yet have a motor. That may just be a pipe dream, but I am hoping that someday I'll be able to afford a little 2hp yamaha to slap on there. Meanwhile the bracket's primary function will be to support the kick up rudder. You may notice a problem with this picture. The rudder assembly is too low. It's low enough that I won't be able to kick it up because the tiller (which I'll eventually make) will hit the iako first. See where the top of the rudder butts up against the crossbeam? That's where the tiller will have to be able sit when the rudder is kicked up. I think the solution is simple; just relocate the pivot point for the rudder kick up about an inch and a half up from where it currently is.

Saturday, September 15, 2012

Hinged Crossbeam


Today was one of those moments in Shan Skailyn's construction that I've been waiting for a long time! I got the crossbeam hinges mounted!

It was a scary thing to cut into the crossbeams knowing there was no turning back after starting with that. Since I originally had not planned on these hinges, the crossbeam section needed some modification to make it work. I had to chisel out the old spacer block after cutting the crossbeam. Where the hinges had to go just happened to be right where one of spacer blocks was put for spacing between the two stringers. That block, had it been big enough to take the hinge bolts would have been perfect. But alas it wasn't to be. So I had to carefully chisel that out, then dress up a new block that had the length that would be needed to properly secure the hinge. All that went surprisingly well. When installing the hinges the fit was just tight enough that I had to lube up the crossbeam to be able to get the hinge on. I chose to do that with epoxy so as to seal it all up and keep moisture from doing damage to the wood underneath the stainless steel. The fit was still tight enough that I still had to pound the things into place. But it wasn't so tight that it shaved any wood off or otherwise destroyed anything. In other words... perfect! Each hinge side has 4 flush mount machine screws that are epoxy bonded into the now solid wood core of the beam. Sometime after the epoxy completely hardens I'll clean up around the edges and touch up with some paint. What started out as kind of a scary project has turned out to be well worth it. These hinges are very stout... probably quite a bit stronger than they need to be. But better safe than sorry! One more good thing I noticed is that there is no room for any rattling in the hinges. Everything is tight fitting which should minimize annoying sounds while sailing.

Thursday, September 13, 2012

In Pieces

Shan Skailyn's hull is made to disassemble into three 8' sections for storage in smaller spaces.

Wednesday, September 12, 2012

Small detail

This is a little stainless steel piece I had to cut to fit around and hold the hex head of the leeboard bolt. This keeps it from spinning when I tighten down the leeboard. This is the only way I can tighten the leeboard enough so that it is able to hold in place with a reasonable amount of force against it. Note also that rather than use an underseat bracket as in Gary's book, Gary recommended I try simply stiffening the whole side with a piece of timber and mounting through that. Much simpler solution.

Monday, September 10, 2012

All assembled... again


I've had Shan Skailyn set up out on our little helicopter pad for the last couple weeks. I just needed to have it assembled for a while so I could check some details that I otherwise would have a hard time checking. With the heavy rain we get I just kept it under a tarp until I would work on it on the weekend. I also made the discovery that both my ama sections are leaking somewhere! Ughhhh! I've checked them over for any bad joints... nothing. I'm pretty sure it's just the inspection ports. Gary recommended I grease around the o-ring seal. Will have to do that and set back out in the rain to see what happens.

Saturday morning I disassembled the whole thing again and moved all the parts into our little office building where I store it here in Mibu. Now that I have everything built, I'd really like to weigh everything and get a total rigged weight. Really curious what that is. Will post when I do end up doing that.

Really the only difference in these pictures is that I have Shan Skailyn's hiking seats installed. I took a number of other photos of details that I'll post throughout the week. So stay tuned.

Saturday, September 8, 2012

First paddle nearly complete

On one of the three paddle handles I molded, I was able to get one totally glued up with the blade. This morning I did an extra good sharpening on my hand plane and went to work. I'm pretty happy with how the whole thing turned out. Yeah, I know I said I was going to do a variation of one of Tim Anderson's quick paddles, but ended up deciding that with all the time I have between now and the maiden voyage, I'd like to try to glue things up proper. I might do a quick paddle for the fourth just to have some variation to play with. One other thing is that I planed the blade thin enough that I'm worried about the glue joints splitting. So I'm thinking of making several 'bowtie' inlays on either side, spanning the joints which should add quite a bit of structural strength. The other option I'm contemplating is to just maybe slap some fiberglass over the tip of the blade.

So the whole thing, unfinished, and without the topmost handle piece weighs exactly 2 lbs (32 oz). Not sure how that compares with other paddles out there, but it feels light to me. And if you're interested in knowing, the blade is made of what I believe to be rosewood, a very commonly available wood here in Papua New Guinea.

Sunday, September 2, 2012

Hiking Seats and Paddle Genesis

(Okay, this is getting ridiculous. Can't seem to get my email out intact... We need internet out here in the bush!!!!!)

Finally put the hiking seats together. Actually kind of piddled away at them in the evenings throughout the week. I decided to deviate from Gary's design (something I've done sparingly on this build) and go with webbing for the hiking seats. I've got a bony rear end and the thought of sitting on wooden seats doesn't appeal to me if I can avoid it. These are comfy cozy! In addition I'm sure they're lighter too. Anywhere where a little bit of effort can save a good deal of weight is a good way to go. I cut the frame out of teak. Teak has it's own nice preservative oil in it (which gums up saw and planer blades, by the way) which is why I skipped varnishing. I figured this stuff will weather nicely without any treatment.

Then this morning (sat) I milled up some old dried bamboo I have sitting around. Just enough to get some strips about 7/8" wide. I wanted this for making my bent shaft paddles. I'm hoping to make a variation of Tim Anderson's instant paddle. Just going to try to make it with the bent shaft. The plan is (mostly based on a guess) to make it a bit of a stretched out version of what one typically sees on the bent shaft paddles. My guess is that because I'm sitting up higher above the water than I would on one of those OC's that my paddles will need the appropriate adjusting. Bent portion up high enough that it does what it's supposed to do in relieving tension on the lower hand. The blade is also stretched a bit at about 15". Then the angle of the blade will be 8-9 deg instead of 10. I realize I may have absolutely no idea what I'm talking about. I'm just gleaning info from the little tiny bit I've downloaded from the internet for reading here in the bush. Otherwise I have no resources that talk much about paddle design. I may end up making one of these and throwing it away because it sucks. Anyway, today I decided to try my hand at milling bamboo for the shaft. Bamboo is so light and strong I figured it may make for a great, lightweight handle. Once the glue dries I'll test it out under some pressure and torsion and see what it feels like before continuing with it. If it feels strong enough I'll make the other handles (going for three total) and then move on to the blades.

Oh yeah, in other news, I've scheduled Shan Skailyn's maiden voyage up the coast for March 18th. It's a long way off, but logistics require it. It's mostly because of so many months between now and then that I decided to goof around with the fancy bent shaft paddles instead of something much simpler. Why not, right?!

Thursday, August 30, 2012

Mast and Boom Assembly

Here are some pictures of Shan Skailyn's stub mast and luff spar all assembled last weekend. As you can see, I still have some loose ends to tie up. Some of it depends on whatever reefing system I settle on. My original plan to reef by lowering the sail has proven to be problematic. Not impossible, just requiring more gear than I have at the moment.

Note the two cleats on either side of the stub mast. The one on the right in the picture is for the halyard, so I can quickly release in case things feel out of control (necessary for this unexperienced wanna-be sailor). The other cleat is for the rope that keeps the luff spar tensioned in it's universal joint.

Saturday, August 25, 2012

Raise the Sail

Ugghhh, our email system keeps butching my emails... Trying again

Today was an exciting day! For the first time ever I got to see how Shan Skailyn's rigging is all going to work out. Raise that sail!

Friday, August 24, 2012

2012_08_8545.jpeg

The attached file was originally sent with another message.

File Name: 2012_08_8545.jpeg

2012_08_8548.jpeg

The attached file was originally sent with another message.

File Name: 2012_08_8548.jpeg

Thursday, August 23, 2012

Stub mast retainer

(Gonna try to post this again. Yesterday's post got screwed up by our funky email system)

Slowly putting together pictures of little tidbits I've done on Shan Skailyn here and there.

This is the mechanism I made to keep the stub mast in place in case of capsize. It's just a little stainless steel tongue. Only way to remove the stub mast is by depressing the tongue prior to sliding out of the step. The other picture is the deck level mast steps. One for the stub mast (with leather collar just to keep the mast from knocking around) and below it, the universal joint (where the luff spar will sit). Everything seems to fit and hold really well.

Monday, August 20, 2012

Bamboo Mast Completed

I was able to put the finishing touches on the bamboo mast. If you remember, this is part of a stub mast configuration, so the base is made to pivot in a socket; kind of like a universal joint. The eye splice (pink loop) is for threading the downhaul from the boom. The orange wrap is to prevent the boom jaws from wearing into the bamboo. When I lower the sail for reefing, the white collar keeps the boom jaws from dropping below a certain point. In the other pic you see the sheave I installed at the head of the mast so that I can lower the sail for reefing.

Currently working on building the reefing system into the sail and boom. Pix to follow!

Thursday, July 5, 2012

The finished crossbeam hinge

Tadaaaa! The hinges are finally finished! Can't wait to get them back to Mibu and make the modifications to mount them.

Special thanks to Jim Ellis at Credence Engineering (http://credenceeinc.com/) for giving so much time and effort and resources to make these for me and consider it a donation. Wow! So extremely grateful!

Sunday, June 24, 2012

Crossbeam Hinge Saga continued


Things are coming together nicely on the crossbeam hinges. I'm super thankful for my friend, Jim Ellis, at Credence Engineering for offering to do all this for me at no cost. He's put a lot into this and I just can't appreciate it enough! So I'm doing some of the manual cleanup of these parts with files and a buffing wheel. Also made this wood block (in pic) so that the pieces can be clamped together square and then welded. Still got a few hours of work left before Jim's ready to weld the pieces. Seeing it all come together, I'm certain this is going to be a solid hinge and will be worth it's weight in gold when transporting Shan Skailyn.

Thursday, June 21, 2012

Folding iako hinge in the making

My friend emailed me these photos today of the hinge parts having been cut. Awesome! Can you guess what these were cut with? W A T E R ! ! Yeah, these were cut out of 1/8" stainless steel with a water jet!

Sunday, May 20, 2012

Folding iakos (crossbeam) hinges

I worked together with a machinist friend of mine to design this hinge for a folding iakos conversion. Obviously the design originated with Gary Dierking's as seen on his Va'a Motu. Thought we'd beef it up a bit and make it a complete box construction. Not sure when they'll be ready, but I'm quite excited to see the real thing and get it installed on Shan Skailyn!