
Sunday, September 16, 2012
Motor/Rudder Mounting Bracket
Saturday, September 15, 2012
Hinged Crossbeam


It was a scary thing to cut into the crossbeams knowing there was no turning back after starting with that. Since I originally had not planned on these hinges, the crossbeam section needed some modification to make it work. I had to chisel out the old spacer block after cutting the crossbeam. Where the hinges had to go just happened to be right where one of spacer blocks was put for spacing between the two stringers. That block, had it been big enough to take the hinge bolts would have been perfect. But alas it wasn't to be. So I had to carefully chisel that out, then dress up a new block that had the length that would be needed to properly secure the hinge. All that went surprisingly well. When installing the hinges the fit was just tight enough that I had to lube up the crossbeam to be able to get the hinge on. I chose to do that with epoxy so as to seal it all up and keep moisture from doing damage to the wood underneath the stainless steel. The fit was still tight enough that I still had to pound the things into place. But it wasn't so tight that it shaved any wood off or otherwise destroyed anything. In other words... perfect! Each hinge side has 4 flush mount machine screws that are epoxy bonded into the now solid wood core of the beam. Sometime after the epoxy completely hardens I'll clean up around the edges and touch up with some paint. What started out as kind of a scary project has turned out to be well worth it. These hinges are very stout... probably quite a bit stronger than they need to be. But better safe than sorry! One more good thing I noticed is that there is no room for any rattling in the hinges. Everything is tight fitting which should minimize annoying sounds while sailing.
Thursday, September 13, 2012
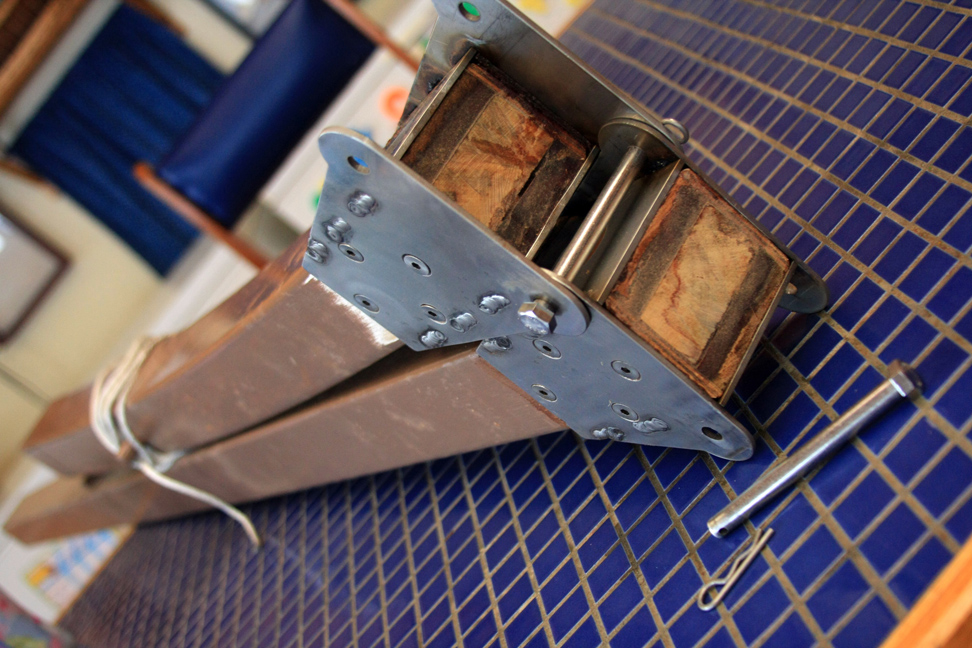
In Pieces

Shan Skailyn's hull is made to disassemble into three 8' sections for storage in smaller spaces.
Wednesday, September 12, 2012
Small detail

Monday, September 10, 2012
All assembled... again


Saturday morning I disassembled the whole thing again and moved all the parts into our little office building where I store it here in Mibu. Now that I have everything built, I'd really like to weigh everything and get a total rigged weight. Really curious what that is. Will post when I do end up doing that.
Really the only difference in these pictures is that I have Shan Skailyn's hiking seats installed. I took a number of other photos of details that I'll post throughout the week. So stay tuned.
Saturday, September 8, 2012
First paddle nearly complete


So the whole thing, unfinished, and without the topmost handle piece weighs exactly 2 lbs (32 oz). Not sure how that compares with other paddles out there, but it feels light to me. And if you're interested in knowing, the blade is made of what I believe to be rosewood, a very commonly available wood here in Papua New Guinea.
Sunday, September 2, 2012
Hiking Seats and Paddle Genesis


Finally put the hiking seats together. Actually kind of piddled away at them in the evenings throughout the week. I decided to deviate from Gary's design (something I've done sparingly on this build) and go with webbing for the hiking seats. I've got a bony rear end and the thought of sitting on wooden seats doesn't appeal to me if I can avoid it. These are comfy cozy! In addition I'm sure they're lighter too. Anywhere where a little bit of effort can save a good deal of weight is a good way to go. I cut the frame out of teak. Teak has it's own nice preservative oil in it (which gums up saw and planer blades, by the way) which is why I skipped varnishing. I figured this stuff will weather nicely without any treatment.
Then this morning (sat) I milled up some old dried bamboo I have sitting around. Just enough to get some strips about 7/8" wide. I wanted this for making my bent shaft paddles. I'm hoping to make a variation of Tim Anderson's instant paddle. Just going to try to make it with the bent shaft. The plan is (mostly based on a guess) to make it a bit of a stretched out version of what one typically sees on the bent shaft paddles. My guess is that because I'm sitting up higher above the water than I would on one of those OC's that my paddles will need the appropriate adjusting. Bent portion up high enough that it does what it's supposed to do in relieving tension on the lower hand. The blade is also stretched a bit at about 15". Then the angle of the blade will be 8-9 deg instead of 10. I realize I may have absolutely no idea what I'm talking about. I'm just gleaning info from the little tiny bit I've downloaded from the internet for reading here in the bush. Otherwise I have no resources that talk much about paddle design. I may end up making one of these and throwing it away because it sucks. Anyway, today I decided to try my hand at milling bamboo for the shaft. Bamboo is so light and strong I figured it may make for a great, lightweight handle. Once the glue dries I'll test it out under some pressure and torsion and see what it feels like before continuing with it. If it feels strong enough I'll make the other handles (going for three total) and then move on to the blades.
Oh yeah, in other news, I've scheduled Shan Skailyn's maiden voyage up the coast for March 18th. It's a long way off, but logistics require it. It's mostly because of so many months between now and then that I decided to goof around with the fancy bent shaft paddles instead of something much simpler. Why not, right?!
Subscribe to:
Posts (Atom)