Wednesday, July 27, 2011

Bulkheads, Perimeters and more

(I sent this before, but something with our email server messed up the message... so posting again here)
Another productive weekend. Not a lot of time, just a few hours overall, but got a lot done on Shan Skailyn in the time that I did have. Last week, I did manage to squeeze in little bits of time for gluing here and there, to keep the process going. Again, 15 minutes one day, 20 minutes another... it all adds up.
So this weekend I was ready to finish cutting the station 1 bulkhead perimeters. I did manage to finish gluing up all the perimeters as well. I ran out of my 3/4" brass ring nails before I could finish gluing up the station 1 perimeters so I had to settle for using my brad gun. I'm hoping to get more nails within the next couple months when I can then reinforce these perimeters with them. The struggle for me, is going to be NOT going ahead and gluing the hull together. It's a major milestone! Can't wait to begin to see Shan Skailyn's form emerge from all this work! And the only thing holding me back is not being able to reinforce my bulkhead perimeters! Ugghhh! There is plenty of other stuff I can do in the meantime, like working on the hardware, or gluing up timber for the kick up rudder and/or leeboard, building the motor mount bracket, etc.
One goofy problem I had, from which I hope someone else can learn, is when I was drilling my 5/16" bolt holes through the station 2 bulkheads, I ran into an easily avoidable problem. I kept hitting nails with my drill bit! Now when I was nailing the perimeters on, I thought briefly, "What if I put these nails right where the bolt holes are supposed to go... Eh, what are the chances!?" Well as it turns out, the chances are pretty good! About half of the holes I drilled happened to intersect with some part of the ring nails! Wasn't too terrible, except it messed up my nice precision point drill bit. I did manage to make do pretty well though. Once I heard the familiar nick-nick-nick of the bit hitting metal, I backed off. Then I came back with a harder drill bit to slowly cut the rest of the way through the nail, making a clean hole. One of the holes, however, had something go wrong. All I can figure is that a piece of the nail came out, swirled about in the hole like shrapnel and opened up the hole considerably. I don't think it's going to be a huge problem. But I am thinking about maybe filling with epoxy and re-drilling that one. The inside of the hole is all 'fuzzy' since it wasn't actually cleanly drilled. What's the lesson learned? Mark your hole placements before you drive your nails! Chances are good you're going to put one right where you need to drill!
One other problem I realized this weekend. I messed up on the measurements of the bolts for connecting the bulkheads. They're too short! Had to order more. Now I have to find an inexpensive way to get them over here in the next couple months... along with more brass ring nails.
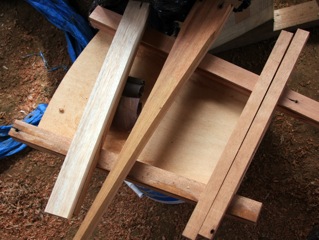
At this point, my focus is going to be to continue finish getting everything ready to get glued. Not quite there yet. But I did manage to get the notches for the chines cut out of the bulkhead bottom edges (see pix). Got all the bulkhead sides planed and matching very closely to each other. Need to round a few edges here and there, mark up the sides for the station placements, cut the miter on the chines at the stern and bow, along with some other smallish tasks. Once everything is ready, I need to wait for my nails which I probably won't see till September. Can't just go to home depot and buy stuff out here!
As I mentioned before, I've got some of my own hardware I'm going to have to fashion. One is, per Gary's plan, I need to make the leeboard 'plate' out of 1/8" out of aluminum (or 'aluminium' if you're Aussie!). The other thing that I just figured I could make easily enough is the hinged rudder brackets; the brackets on which the rudder pivots for steering. We have an old, broken washing machine tub made of stainless steel. I did manage to cut a sheet of this stainless steel off the tub this weekend. It's from this sheet that I'm planning on cutting and forming the brackets. Need to draw up plans for those and get cutting and shaping. Tin snips and a collection of files, along with various drill bits will be my tools of choice for the brackets.


Tuesday, July 26, 2011

2011_07_5045.jpeg

The attached file was originally sent with another message.

File Name: 2011_07_5045.jpeg

2011_07_5043.jpeg

The attached file was originally sent with another message.

File Name: 2011_07_5043.jpeg

2011_07_5042.jpeg

The attached file was originally sent with another message.
File Name: 2011_07_5042.jpeg

Sunday, July 17, 2011

The Hull Story


On Saturday I was able to put several more hours into Shan Skailyn's hull. Things are definitely progressing along. But it's little bits at a time. One thing I'm reminded of is just how much work goes into all the cutting, planing, and preparation for a project like this, before you start putting anything together. I've done carpentry on and off for years and I always have to be reminded of that in each project I do!

So this weekend, I continued gluing more of the gunwales and chines onto the sides. Most people think of Papua New Guinea and think 'hot and humid'. But we're up high in the mountains, about 12 miles off the coast. Our weather here is cold, down in the low 50's in the morning and evening. Maybe tipping into the low 80's on nice days. Lately though, we've been in the 70's during the day. All that to say, I've learned that epoxy is going to take a LONG time to cure in these temps. It's taking about 24 hours to harden enough where I can barely push my fingernail into it. Then another day before it's fully hardened. Apparently gluing stuff together is going to take a while since I'm limited on clamps. I think once I'm done with the chines and gunwales though (only enough clamps to glue up 2 long pieces at a time) then things will probably pick up a bit. So far, I've managed to finish both sides for the middle section and I just finished gluing up the last of the chines and gunwales on one of the end pieces this morning. Usually only takes about 20-30 minutes of work to glue up two pieces, so maybe I can piece the rest of it together sometime during the week. Time will tell. I have a busy work week planned this week.

I cut all the pieces for the bulkhead perimeters. All that's left to cut is the lengths, angles and curves for the two station 1 perimeters (see pic). All the perimeters were cut from scrap pieces of tongue and groove flooring. It all worked out really well. I also managed to get station 3 (from Gary's Wa'apa plans) all glued up (see pic). I think for gluing my bulkhead perimeters, I'm going to take the easy way and use my brad nailer to get everything solid in place. Then I'll come back around with my bronze ring nails for the real support.

Also cut my stems. However, I realized that I put the 10 degree taper the wrong way; going narrower than the planned 3/4" width at the bottom; The wrong way! Debating whether or not I should recut those. Will that small thing make a big difference? It'll make the bow and stern narrower by a little more than 1/4". Maybe that'll be a good thing. Any thoughts? Any reason that that much of a difference in the stem width (at the bottom end) would cause serious problems? All I can think of is that the wood might split when I nail it. If anyone knows better, I'd appreciate some feedback here.

Saturday, July 16, 2011

Sails Away

Well maybe I ought to save that subject title for Shan Skailyn's maiden voyage. Oh well.
So this is what a couple weeks of piddling (10 minutes here, 20 minutes there, another 15 minutes there, plus a couple larger blocks of time on the weekend) can accomplish. I've managed to finish sewing up Shan Skailyn's poly tarp sail. Feels pretty good to actually get something completed! It's all sewn with polyester thread. I got the grommets from duckworks and am really happy with the quality. They're heavy duty and installed just as easy as could be.
My sail follows the plan for the 24' Wa'apa tacking sail in Gary Dierking's book.
I also worked some today (Saturday) on the hull. Pictures forthcoming...

Tuesday, July 12, 2011

Response to comments

Hey DaveP, once again, thanks a ton for your input!
I'll have to try the coffee grinder on the sawdust. In order to keep the dust as fine as possible, I've been using stuff from my sander. It's not as fine as flour, but much more fine than what the saws produce.
So now, I'm wondering if I should do anything to 'fix' what I have already glued, or just leave it. I would think that I don't want to take chances with the chines or gunwales coming loose at any time. So far, I've only glued (and nailed with bronze ring nails) the 2 chines on the middle section sides, and one of the gunwales on one of the middle section sides. It's not too far down the road so as to be unsalvageable. I'm wondering how I could 'test' to see how things are going to hold. As far as solutions, I would imagine that the one least prone to cause irreparable damage while still doing the job well, will be to reinforce more with nails and then fillet those joints. I'm planning on fiberglassing the bottom with a 2-3" overlap, so that will help quite a bit too. Maybe some bonded screws toward the ends of the gunwale, closer to where all the stress will be from the iakos? Any other thoughts for making sure my boat doesn't fall apart on me out at sea?
Then obviously for the rest of my joints, I think I'll take your advice to make sure I get good adhesion. Good thing I asked!

Monday, July 11, 2011

Epoxy thickener

I glued up a few of the chines and gunwales this weekend. Went alright. But I've been using sawdust from my sander to thicken the epoxy. I don't like the way it thickens it; not for gluing at least. I suspect the wood is 'drinking' up the epoxy and forcing me to use more than is necessary. I don't have any other 'thickener' available and wondering if anyone has any ideas or experience using other household materials to thicken epoxy? I was wondering if flour would work. No stores out here in the middle of the jungle! Thoughts? Anyone?

Sunday, July 10, 2011

Response to comment

DaveP, thanks a TON for your comments regarding bamboo and the construction method of your iakos. Extremely helpful. Since I've got plenty of time to wait, I'm planning on doing some tests on the particular type of bamboo that I'm planning on using here. I'll do one piece with fire, I'll leave one bare, I'll clean one with acetone before varnishing, and I'll sand and varnish another piece. I'll try to do that soon. When they're done, I'll leave them out in the rain and sun to see what happens to them over the next half year or so.

I'm planning on having my stub mast made out of wood and my luff spar and boom out of bamboo. I do have the option to use solid wood spars all around. There are tons of spindly, strong, lightweight woods around here that are straight as an arrow. The Mibu people harvest them all the time to make their ridge poles in their huts. However, I think the type of bamboo I'm looking at surpasses in both strength and lightness of weight. I also like the look. I just don't want to mess with having to custom make the step for the fixed mast should the bamboo ever have to be replaced. I'm thinking I want to make sure the mast only ever has to be done once.

The more I go along, the more I'm thinking how much I like the idea of making the hollow box frame iakos. I'd love to see a picture of what you've done. If you can manage to get a pic and message under 80kb email me a pic sometime. geoff_husa(at)ntmdotorg. The size restriction is because I  pull all my emails over HF radio. It's SLOW and quite limited.

(You'll have to pardon my method of responding here. No internet from out here in the bush. But I can generate new posts via email. So welcome to my way of responding to comments!)

Monday, July 4, 2011

2011_07_4855.jpeg

The attached file was originally sent with another message.
File Name: 2011_07_4855.jpeg

Sunday, July 3, 2011

Sawdust-n-Sails

Yesterday, I was able to spend nearly the full day working on Shan Skailyn. Shannon (my wife) and the kids were all busy with other stuff and gone much of the day. Only restrictions had to do with baby Abigail and her naps. No tools during naps!
So I finished cutting and planing the chines and the last little bit on the gunwales. I sorted through a bunch of other lumber and pulled out what I'll be using for the bulkhead perimeters, stems, seat supports and the like. Will be using a bunch of cutoff pieces from when we installed our floor. It's all 3/4" x 4" mixed hardwood tongue and groove flooring cutoffs, including stuff like kwila (ironwood), mahogany, and other standard hardwoods found here in Papua New Guinea. I tried to divvy them up so that the hardest stuff (ie. kwila) is to be used for the ama struts and the sides of the bulkhead perimeters where the bolts will be passing through. Then I'll want the lighter weight stuff to be used in all the other places.
Still haven't determined what I'll use for the iakos. Actually contemplating using bamboo, but I remember reading that Gary Dierking's concern with using those is that unless a way is found to provide structural support at the lashing points, that may be a major weakness. The walls of bamboo can be prone to crushing under such strain as the iakos experience. Will have to think about that and also experiment with bending the bamboo. I'm perfectly happy to do the either the laminated solid iakos or the hollow box frame construction like in Gary's book, but it seems that bamboo would be the lightest option if it would be strong enough at the lashing points and formable enough to get the downward curve at the ends.
I also managed yesterday afternoon to cut the sail out of my tarp material. Moved all the furniture out of the living area in our house. The kids were around then and thought it was a blast! So we laid out the sail, cut it, and even sewed the leech seam as well as a single dart in the foot and one in the tack (for the equivalent of the broad seam).
One thing I'm very concerned about at this point, and would LOVE to get some feedback on before proceeding any further) is whether or not sewing is the best option on this tarp. This polytarp is not of the woven variety. It's a solid piece of plastic. Same material, just not woven. Well my fear has been that sewing the unwoven stuff would actually serve only to act as a perforation line, making for a weak spot in the sail where it will be likely to tear. Well on my test pieces, I'm finding that to be true. It takes quite a bit of pulling to make it happen, but it does tear right along the stitches. It does require strong pulling for it to tear, but it always tears along the stitch. One thing I'm thinking about (assuming I decide to keep this material for the sail) is taping over all the seams as a backup, using either duct tape or packing tape. But I really would like for this sail to look nice if possible. Any ideas or thoughts out there? I need some help figuring out what the best long term solution will be here! If you have thoughts, post your comments!


Saturday, July 2, 2011

Response to comment

DaveP, in your comments about curing bamboo you said, "don't be tempted to do any sanding, scraping." I'm curious if you happen to know why you shouldn't sand or scrape that outer layer? I've heard that before, but never heard why. It seems like a number of people out there do sand it off and then put varnish over it. But none of them ever mention how long their bamboo spars last. What's the importance of that outer 'skin'?

(You'll have to pardon my method of responding here. No internet from out here in the bush. But I can generate new posts via email. So welcome to my way of responding to comments!)