Saturday, December 31, 2011

Tadaa... Finished paint job


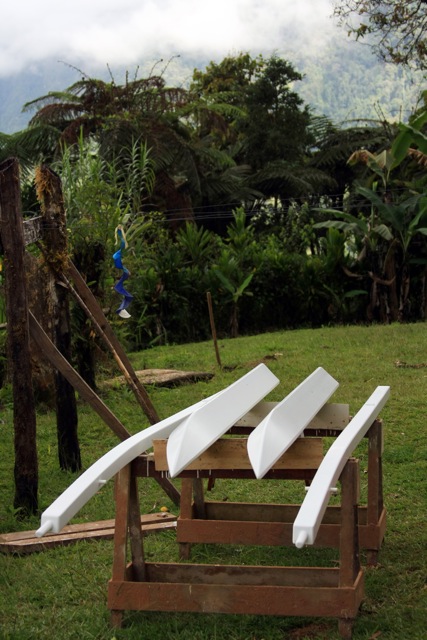
Our family took this whole week off after Christmas... well mostly off. Still had some little work things that came up but all in all it was a decent week off. So I managed to get Shan Skailyn's hull, iakos and ama completely painted! The paint job is finally done!!! That was a huge job!
So check it out! Shan Skailyn in all her slightly gaudy, painted glory! Our two older girls and some visiting friends were quite excited to play with 'Rusty' the tree kangaroo in the boat.


Even though I just used exterior acrylic paint, I'm thinking that with the 4 coats of primer and at least 3 top coats (the red needed more to keep the primer from showing through) that the paint job ought to hold up a good long time. I sanded in between all the primer coats (not the top coats) which helped produce a nice smooth finish overall.
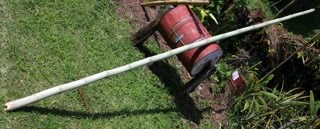
One little tip for any other would be boat painters out there. If you're not using masking tape and still wanting some fairly clean lines in your paint job, use a little edge painter like the one I used. I actually had masking tape but on the pieces I tested it on it just was leaving a ton of hard to remove junk and the adhesive was just too strong. I was worried it was going to remove paint. So I first opted to hand paint the lines in using some little artist paint brushes we had on hand. S-L-O-W! Also, the lines were still too ragged for my taste. That's when I rummaged through my supply cabinet and found that I had this little edge painter. It's just a flat pad, with lots of short, soft bristles and a little grip on the backside. It's made for painting right up into corners with no mess and no masking. I decided to try it and was blown away by how smoothly it lays down paint... no bubbles, hardly any streaks... just smooth. It also makes it so much easier to paint a nice clean straight edge. Everything about this little device really made it the perfect applicator for the whole paint job (except for filleted corners). So I used it for everything once I discovered I had it. Can I say again that this thing laid down a super clear coat? Better than any roller or paintbrush I've ever used. I think a sprayer probably would have done better, but for the low budget people, this thing is a treat! Get one for your boat!

Monday, December 19, 2011

Total weight so far

OK, so yesterday afternoon on a whim, I decided I'd weigh everything up that I have done so far... or nearly complete. Right now is probably a great point to weigh a bunch of these things since all the fiberglass is done and the first coats of paint are on and dry already. Very little weight will be added later with the exception of some little bits of hardware here and there. So without further adieu here are the weights of individual parts:
Hull fore section 22 kg
Hull mid section 24 kg
Hull aft section 21 kg
Both crossbeams 15 kg (7.5 kg/ea)
Assembled ama 14 kg
Leeboard 6.5 kg
Rudder assembly 2.5 kg
Roughed out stub mast 7 kg
----------------------------------------------
TOTAL 112 kg (246.9 lbs)

Sunday, December 18, 2011

2011_12_6148.jpeg

The attached file was originally sent with another message.
File Name: 2011_12_6148.jpeg

2011_12_6145.jpeg

The attached file was originally sent with another message.

File Name: 2011_12_6145.jpeg

Primer all done

Okay, let's try this email thing again. For some reason it seems incapable of delivering an email with its attachments. This is the message that was supposed to go with the last two pix.

Got Shan Skailyn's iakos (crossbeams) and both ama sections (the outrigger float) painted with primer today. Not just one coat, but three... all in one slam bam morning working in the warm sun. The stuff was drying fast enough that once I finished putting a coat on the other pieces, the first piece was ready to sand and coat again. So just busted it all out today. Next step will be to put the top coat on everything.

At little odd times here and there through the week I managed to put the strip of fiberglass over the keel line of the ama as well as the reinforcing wraps around the end of the crossbeams where the ama struts mount and exert lots of forces that threaten splitting the beams.

Really the only thing left to paint will be the motor mounting bracket which I have yet to build. For the motor mount, I'm seriously thinking about deviating a bit from Gary's plans and lashing the thing on the crossbeam, rather than using a bolting assembly. I figure if I modify the design just a touch so that the sides, instead of just resting flat under the crossbeam, are built up a couple inches higher and then given cutouts into which the the crossbeam sits snugly, then some nice tight lashing should hold the thing quite well. Can anyone with experience tell me if this is folly? After assembling Shan Skailyn the other day and seeing just how amazingly strong those lashings are, I figure with the proper modifications the motor mount could be installed the same way (still using Gary's recommending anti-torqueing line of course).

2011_12_6145.jpeg

The attached file was originally sent with another message.
File Name: 2011_12_6145.jpeg

Saturday, December 10, 2011

Seeing it all come together

We have the pleasure of a visit from our helicopter pilot, Mike, and his family this weekend. Coming in with them and with the helicopter today we got our supplies in... including our mail... which also includes the hex nuts that I've been anxiously awaiting for the bolts to connect the hull pieces together. I can finally assemble the hull!
Mike and I spent the afternoon putting all of Shan Skailyn's pieces together to see just how everything is looking so far. Such an awesome feeling to see all that come together!
Everything fit the way it was supposed to. That's a good sign! I was surprised at how strong those lashings actually are, joining the iakos (cross beams) to the hull. One helpful piece of information for anyone ordering parts for a similar project is that each lashing point on the iako to hull connection takes about 9 feet of small diameter rope. In my ignorance, I had only planned and purchased enough for one meter on each lashing point. By the time we had joined everything together, including the ama to iako connections, I had very little left of the mere 65 feet of rope I had purchased. Gonna have to buy more.
There was a lot of interest generated among our kids and the many Mibu kids that were up playing in the area as they saw this oddball project come together in this place with nowhere to sail!
Mike and I also took this chance to talk about how things will have to work out when the helicopter that you see in the background carries all this 12 miles out to the coast sometime next year for its maiden voyage.


Wednesday, December 7, 2011

Keep on priming

Just another weekend of applying primer coat after primer coat after primer coat. You forget how much work painting is! Painting, anxiously waiting and checking for it to dry, then sanding, and going through the whole process again... and again.
As of now, I've got 4 good coats of primer on the aft section of the hull with only 3 so far on the fore and mid sections. I'm debating whether or not 3 coats of primer is enough. First off, I'm tired of applying the stuff. Second, 3 heavy coats seems like it might just be enough. Especially considering that I've got at least 2 gloss top coat that will be going on later. BUT since this is just lowly acrylic house paint, I do want to make sure I'm applying the necessary amount to hold up a good long time. Is three coats of primer and 2 coats of gloss top coat enough for a boat that will always be out of the water when not in use?

Monday, November 28, 2011

Small Details

Here are the pix of the leeboard brackets. Note the plural. And note the fact that these are not per Gary's book. In talking with Gary over email he recommended trying a mere timber stiffener rather than the bracket he shows plans for in his book. The timber stiffener starts at the gunwale and goes all the way down to the chine. Each piece is glued and screwed with 8 screws. It was simpler and made lots of sense. I also wanted the option to shift the CLR of the hull a bit as I gain a feel for how Shan Skailyn tacks. So Gary also recommended putting two leeboard locations about 300mm apart. With the swing of the leeboard, there's actually quite a bit of shifting of the CLR that can now happen. You might notice that above each bolt hole I plugged another hole. I was over eager to drill! I decided later (again, due to Gary's recommendations) that the leeboard needed to be a few inches lower. Easy fix.
Then in the other picture you'll see the finished mast step. Nothing fancy there. Just a single piece of wood with a square cutout to fit the base of the stub mast. The really nasty dark stuff on the inside of the hull with the mast step is much worse than it looks. Just a result of doctoring up an overly dark photo. The stub mast is another thing that's been slowly coming along. Nothing worth taking pictures of yet. Actually I wish I'd taken a picture of the original piece of timber for before and after comparison pix. Oh well. Er, wait a minute, I think I did some time ago.

Get 'yer primer on

Didn't have a lot of time to work on Shan Skailyn this weekend. BUT, I did manage to get the first two coats of primer on the aft section of the hull. In preparation for painting I had some little details to finish out, which I did. The leeboard mounting bracket is on and the holes are drilled, the mast step is located and fastened in place (pix forthcoming). At this point, other than some more sanding and scraping I'm ready to really push forward with painting everything.
Had a major disappointment yesterday afternoon when I put the second coat of primer on (planning 4 coats of primer by the way). Not 10 minutes after I had applied the second coat and things were looking really nice, a HUGE storm blew in. The rain was extreme and the wind as well. It managed to blow both rain and mud all the way underneath my house, soaking a bunch of my plywood and my freshly painted hull. Not only was the new paint now diluted and dripping down the sides, but the paint that remained had lots of junk embedded in it! Ughhh! As of this morning, not a huge deal. Everything dried OK and after taking a scraper gently over the affected surface and a quick touch up with sandpaper we're sitting at a nice 1-1/2 coats of primer on this hull section.
Also, up till this point I've not been super happy with any of the bamboo that I've had available for my spars. One of my friends mentioned a piece he'd cut recently which sounded like it'd work. He brought that up on Friday. It's a keeper! The dimensions at the base and head are just right. It's got a nice taper. It's thick walled and has an ever so slight curve up toward the head. So we got all the skin scraped off and I'm currently drying it. Also drilled some teeny tiny little holes just above all the lower nodes to drain out the water that collects in there and slows down the drying process.

Monday, November 21, 2011

Iakos (crossbeams)

Here are the finished iakos. My apologies for not getting pix of the process of making them. I went with the hollow box beam design. I'm really glad I did. They seem really lightweight. I increased the overall width and height dimensions by 10% from the solid wood version per Gary's advice and that of others as well. Oh yeah, still have to put a fiberglass wrap around the end where the ama attaches to keep from splitting.
A word of advice... if you're limited to buying JUST the 6 sheets of plywood recommended in Gary's book, make sure you maintain as much of the waste as possible! Don't be liberal if you rough cut things first. I just BARELY had enough plywood to build these iakos. I had to piece things together a little bit on the second one. Other than some small pieces of plywood it is ALL GONE now. Kudos to Gary for laying things out so efficiently in the plans in his book.

Ama Complete! (well, nearly)

I finished Shan Skailyn's ama this weekend! Also finished the iakos (crossbeams). Ama pix in this post. Iakos will be in another since our email system seems more likely to butch things up with more attachments.
For the ama, I went with Gary's advice and filled them with styrofoam. Don't ask where we got that much styrofoam out in the middle of the bush... we just have it. I filled each section to the max. Will help me feel better about any potential leaks sprung while enjoying God's great big ocean!
The stitch and tape job (oh, that reminds me, I've yet to 'tape' the whole keel joint) went well. Never done that before. Definitely takes some fussing with to get things right though. I'm also really pleased with how the ama struts turned out. I was wondering if I might screw something up there. But everything fit and my double and triple checks reveal that all is well. Pretty sure I got all my angles right too. Nothing backwards or otherwise messed up. Whew!
Not a whole lot else to say except, "Bring on the paint!" Realistically, it'll be a couple more weekends before I get to that as there is a lot of preparatory stuff that needs to happen first (ie. fairing and sanding the fiberglass bottoms and then sanding the entire hull).

Friday, November 18, 2011

Beginnings of iakos and ama

Lots of little details that need working on lately. Most of my efforts last weekend went into the ama and the iakos. Along with those, I've also been working on the solid wood stub mast as well as it's mast step (the step with the square hole). Next to that you'll see the mast step for the luff spar (the step with the round dish carved into it. Saw the idea for that one mentioned somewhere by Gary on his website. This seems like a reasonably simple way to make a universal joint for the luff spar when you don't have access to windsurfing supplies. The base of the spar, which will have a rope passing through it, will sit in the cup, with the rope passing through that. With the rope pulled and fastened tightly on the other end, it will provide a great universal joint. And it should be easy and quick to drop the sail if needed. Just loosen the halyard and the rope passing through this mast step and the whole thing comes down.
Should be ready to finish gluing up the ama and the second iako this weekend sometime.

Wednesday, November 9, 2011

All done glassing

(Ah the joys of email from the bush over HF radio... sorry this post was screwed up again. Here's the text that belongs with the last two pix)

Not a whole lot of progress this last weekend. Just a few hours on Saturday then less than an hour Sunday afternoon. But it was enough time to finish glassing the bottom of the two end sections. Looking good! For some reason, I feel a major milestone has been passed now.

I used less epoxy on the end sections than I anticipated. One thing that made a big difference was that I used a different squeegee; one with a rubber piece on it. The last one I had used was just a soft plastic. I also tried the squeegee on the 2nd and 3rd coats of epoxy as well. Worked pretty nice for the flat bottom. Using thinner coats of epoxy got me a lot more print through of the weave (see picture), but it all scrapes down smooth without cutting into the glass, so it must be just enough. All in all, the total epoxy used for both end sections was exactly what it took to just do the middle section; five 5 oz dixie cups full.

Other than that I was able to take the scraper (just using a utility knife blade) to the middle section. All's nice and fair and smooth now! As I was scraping I realized that I may have put the 2nd and 3rd coats on a bit thick. I'll save the final sanding until just prior to painting.

Oh yeah, and I was able to finish getting everything ready to glue up my hollow box beam iakos. All the station blocks are screwed in place for clamping it into it's curved shape. All the wood is cut and just sitting, waiting to be glued.

Next step is getting my solid wood stub mast ready, including the mast step and collar. After that, I think I'll be ready to start prepping the hull for painting!

2011_11_5757.jpeg

The attached file was originally sent with another message.
File Name: 2011_11_5757.jpeg

2011_11_5754.jpeg

The attached file was originally sent with another message.
File Name: 2011_11_5754.jpeg

Tuesday, November 1, 2011

Beginner's experience with fiberglass

I finally deemed the hull ready to fiberglass this weekend. Being my first time ever working with fiberglass I've been nervous about it. I've gathered tons of online material about fiberglass for offline reading in the bush. I've asked a number of questions to glean from Gary D's many years of experience too. He, by far, has the most simplistic, least wasteful, least time consuming method I've come across so far. So I made that first step into the unknown on Saturday morning and fiberglassed the middle section.
I went with Gary's advice about the squeegee. Worked great. Poured the stuff on, starting the center of the hull and then squeegeed it around. Then I followed up with the brush. I'm overlapping the fiberglass 2" up the side of the hull. Squeegeeing didn't work too well on that part. Went with the brush. I also went with Gary's suggestion to try to get all three coats done in one full day, applying subsequent coats prior to the previous one fully curing. We're quite cool here in Mibu. So in order to get the temps to a point where things would cure fast enough to get all three coats on in a day, I started off in the morning by putting the hull out in the earliest sun light available, to warm it up a bit. I also warmed up the resin by putting the epoxy containers in warm water 1/2 hour before getting started. When ready, I moved the warmed hull indoors where the sun quickly warms things because of the corrugated tin roofing. I figured this whole process would have the hull actually cooling down rather than heating up as the resin cured, so as to not make bubbles from air expansion. OK, so done wetting by 9am. No bubbles to speak of and ready for second coat by 11am. Cloudy day, cooling off again around noon, so next round not ready till 2pm. There you have it... all three coats in one day.
All in all, the whole process worked like a charm. This morning, I'm seeing a very clear lay up where all the detail of the wood is visible. Not that clarity matters since I'm painting over it, but hey, it's nice to know I can do it in case I ever want to build another boat someday. However, I can see the cloth on close inspection (see pic). Yet the detail of the wood is nicely seen.
OK, let's talk quantities here; For the middle section (largest surface area to cover) I used a total of 5 dixie cups full of resin. I'm talking about the little 5 oz kids cups here. The initial wetting of the glass used 3. Actually I mixed up three and only used about 2.25 of them. The rest got 're-allocated' to strengthening joints, filling gaps and shaping out the very front end of the foredecks around the stem. Back to numbers... The subsequent coats of epoxy each took significantly less epoxy to fill the weave, each one taking exactly one 5 oz dixie cup full. All in all, glassing the bottom of the middle section of Shan Skailyn took only 25 oz of resin, or about .7 liters. Again, that number is skewed a bit because I made about 3/4 dixie cup too much for wetting out the cloth. So it really should have only taken about 21-22 oz total. I would imagine that each end section would be about two-thirds of the surface area of the middle section, thus using that much less resin on each one.
At this point, I'm a lot less worried that I'll have to buy more resin. I think I'll have enough to squeeze by, especially if I'm careful with the glassing of the end sections. I've been paying careful attention to measuring my resin up to this point, using large syringes to measure out my quantities. Once I got an idea of how much resin is needed for glue, I've been able to use it with very little waste. Being careful with the measurements like that is paying dividends now as it looks like I'll be able to make this thing using 3.75 liters of epoxy (about a gallon) per Gary's recommendations in his book.


Tuesday, October 25, 2011

Hull weight... so far

OK, took a few minutes today during lunch to weigh up the individual hull sections as they are right now. Other than the mast step, glass and paint, there really isn't much that will add significant weight at this point. So these numbers are probably pretty close to what she'll end up weighing.
Fore section - 19.5 kgs (~ 43 lbs)
Mid section - 21.5 kgs (~ 47.5 lbs)
Aft section - 19 kgs (~ 41.5 lbs)
TOTAL 60 kgs (~ 132.5 lbs)
That's not too bad, is it? Considering what's left (sail, rigging, ama, hollow beam iakos, etc) I would guess loosely that I'll easily tack on another 40 kgs. That would put the completed Shan Skailyn at around 100kgs (~ 220 lbs). But that's just guessing there.

Hull nearly completed

(Once again, our fantastic system for emails managed to destroy my original email message, breaking it into pieces and unable to put it together again. Here's the text that was supposed to accompany those last 4 pix.)

I ended up working through the weekend this week. So I treated myself to a day off today (Monday) with the aim of playing with the kids and working on Shan Skailyn.

I thought the cutting and installation of the seats was going to be quicker. But that's about all I completed today. Still good though. Another great step toward getting her done. I also installed the filler strip over the gunwales to bring everything level with the seats. Once the epoxy is cured I'll use the router to clean up the edges (I glued everything slightly oversized) and sand it down.

For the strip over the gunwales I chose to go with a hardwood, thinking it would eventually save on wear and tear over the other option which would have been to use scraps of the 1/4" plywood that is left over. Also, when it comes to lashing the iakos over the gunwale when set up as a 16 footer, I would imagine I'll be happy it's all hardwood there. I noticed on Gary's boat that he has little metal covers over that area, I would imagine for the same reason.

Also, maybe I'm just a dunce and couldn't figure it out from the plans, but the three seats that Gary's plans show on the plywood cut outs don't seem like enough to take care of the needs of the 24' version he shows in the drawings. So what I opted for was to take the foremost seat (the one the mast passes through) as well as the aft most seat and make them out of some 3/4" ply I had sitting around. I dado'd the edges so they are recessed down and are level with the rest of the seats at 1/4" above the gunwale. I would imagine this setup is going to work quite well, though I'm sure I am paying a bit more price in weight.

Speaking of weight, I can't wait to see how much the entire hull weighs. Probably need to wait until it's all glassed and painted first. But knowing me, I probably won't be able to wait that long. Will weigh them soon I'm sure.

One more little tidbit that might be helpful for any other boatbuilders-to-be out there. If you're planning on using the bronze ring shank nails, you'll want about 900 of them just to be sure. I've kept running out because I shorted myself early on. By the time I'm all done, I'll probably have used at least 700. But I wish I'd put twice as many in certain areas along the chine and gunwales. I think I over-skimped there putting a paltry 1 nail per foot... sorry, I can't remember what all I ordered or I'd have a more accurate number.

2011_10_5633.jpeg

The attached file was originally sent with another message.
File Name: 2011_10_5633.jpeg

2011_10_5635.jpeg

The attached file was originally sent with another message.
File Name: 2011_10_5635.jpeg

2011_10_5634.jpeg

The attached file was originally sent with another message.
File Name: 2011_10_5634.jpeg

2011_10_5612.jpeg

The attached file was originally sent with another message.
File Name: 2011_10_5612.jpeg

Tuesday, October 18, 2011

Checking alignment

My very close friend, Sesi, and I were working together on translation yesterday and decided we needed to take 15 minutes during lunch to bolt Shan Skailyn's newly glued up hull pieces together to see how they're all fitting. Sesi has a great interest in seeing Shan Skailyn come together because he's planning on going with us on its maiden voyage. My two older daughters couldn't resist the urge to get in this boat that daddy was assembling in the yard
I'm a bit frustrated that the wrong hex nuts were sent with my bolts. All I can do now is put the bolts through and clamp the thing together across the top of the bulkheads. Definitely don't want to do any moving around of the hull when it's together like that or the strain is likely to break something. I want my bolts! Next chance to get the right nuts won't be till after the new year sometime, as late as Feb or March when we go back to the US for the delivery of the new member of our family.
But I'm happy to say that all the joints are lined up nearly perfect. There will be very little, if any, sanding and filling to match the joints up.

Monday, October 17, 2011

Glued up hull

(You'll have to pardon the last couple posts. Our email system tends to mess things up frequently. Unfortunately I can't get online to fix it either! So here's the text that was supposed to go with the pix)
I managed to get a really good amount done on Shan Skailyn yesterday. All three hull pieces are now glued up, including the bottom panels. I filleted all around the watertight bulkheads. I installed both false stem pieces. Then on one of the end hull sections I managed to sink all the bronze nail heads, fill with epoxy paste, shape the stem (probably will need to work it a bit more so it's not so rectangular looking), sand down excess filling over the nail heads and put a 1/4" round over all around the bottom for when I eventually glass the bottom. Oh yeah, I also put a couple quick, heavy coats of varnish on the inside of the watertight compartment. And one more thing, I made the pattern for the covering over the watertight compartment. WHEW!
I still need to put all the sections together and fair it up, but if my dry fit test was any indication there shouldn't be much that needs to happen there. Unfortunately that will probably just have to wait till next weekend. I'm just out of time this weekend.
I'm quite pleased with how it's all coming together. Unbelievable how much work all this is! But it's going to be so much fun to take the family out on over the years when we're out in town on our breaks.
In other news, we found out recently that we're getting a surprise visit by the stork sometime late April! Our fourth child! Pretty exciting stuff! It does mean a change of plans though. Since Shannon has complicated pregnancies and deliveries and since here in Papua New Guinea there really aren't adequate medical facilities to handle things, we're going to be returning back to the states sometime early next year for about 4 months to have the baby. Not sure what this will do to Shan Skailyn's maiden voyage, but I'm sure it will knock it back a little bit. Anyway, there will be a pause in my posting about that time.


2011_10_5540.jpeg

The attached file was originally sent with another message.
File Name: 2011_10_5540.jpeg

2011_10_5534.jpeg

The attached file was originally sent with another message.
File Name: 2011_10_5534.jpeg

2011_10_5538.jpeg

The attached file was originally sent with another message.
File Name: 2011_10_5538.jpeg

2011_10_5540.jpeg

The attached file was originally sent with another message.
File Name: 2011_10_5540.jpeg

2011_10_5521.jpeg

The attached file was originally sent with another message.
File Name: 2011_10_5521.jpeg

Saturday, October 15, 2011

Finished leeboard and rudder

Here's the pix of the finished leeboard and rudder. Not a whole lot else to say. I would like an opinion on my rudder hinge (whatever that thing is called). Is the way I have it set up going to be alright with the forces that it will encounter? I'm just a touch concerned that the little 'tongues' that are holding the pin just may want to tear.
Bob from Arkansas, any thoughts on that?

Response to comment

Hey Bob from Arkansas, great info! Thanks a ton! A blacksmith, eh? I've been emailing Gary on occasion with my questions. Yes, he's always great to respond with helpful info. I'm trying not to bug him too much though! But he does seem happy to help when he can.

I'm curious what the wall thickness of the bamboo you use is. We've got some stuff here that is really thick walled. It's usually dried in the sun and doesn't crack unless you leave it out for a year or so. When it's dry, it's extremely lightweight and more rigid than an equal size diameter hardwood timber. The stuff I have drying now is just a bit bigger diameter than Gary recommends in his book (that should answer your other question about the book or the plans, BTW) but I'm thinking I'm going to give it a try anyway.

Stay tuned. I've had a busy week so haven't had the time to take and post pix of my final rudder and leeboard. I'm really pleased with how the rudder assembly turned out. It's got nice smooth action with just a small tolerance, seems like it's going to be really strong, and looks halfway decent. I sure used up some of my saw blades and drill bits cutting and shaping that stuff though! Wish I'd known about the cold chisel thing back then!

So, you're a blacksmith, eh? I'll have to keep you in mind sometime with some of the other practical projects I that are so inevitable around here.

Hey, any idea how I can drill a small hole through the end of a 1/4" diameter stainless steel shaft? I want to put cotter pin through it, but have only managed to bind up and break my small drill bits. Any ideas? I first hammered the end flat to make it a bit easier to drill through. Helped, but still no go! That's hard stuff!

(You'll have to pardon my method of responding here. No internet from out here in the bush. But I can generate new posts via email. So welcome to my way of responding to comments!)

Friday, October 14, 2011

Response to comment

Hey Bob from Arkansas, great info! Thanks a ton! A blacksmith, eh? I've been emailing Gary on occasion with my questions. Yes, he's always great to respond with helpful info. I'm trying not to bug him too much though! But he does seem happy to help when he can.

I'm curious what the wall thickness of the bamboo you use is. We've got some stuff here that is really thick walled. It's usually dried in the sun and doesn't crack unless you leave it out for a year or so. When it's dry, it's extremely lightweight and more rigid than an equal size diameter hardwood timber. The stuff I have drying now is just a bit bigger diameter than Gary recommends in his book (that should answer your other question about the book or the plans, BTW) but I'm thinking I'm going to give it a try anyway.

Stay tuned. I've had a busy week so haven't had the time to take and post pix of my final rudder and leeboard. I'm really pleased with how the rudder assembly turned out. It's got nice smooth action with just a small tolerance, seems like it's going to be really strong, and looks halfway decent. I sure used up some of my saw blades and drill bits cutting and shaping that stuff though! Wish I'd known about the cold chisel thing back then!

So, you're a blacksmith, eh? I'll have to keep you in mind sometime with some of the other practical projects I that are so inevitable around here.

Hey, any idea how I can drill a small hole through the end of a 1/4" diameter stainless steel shaft? I want to put cotter pin through it, but have only managed to bind up and break my small drill bits. Any ideas? I first hammered the end flat to make it a bit easier to drill through. Helped, but still no go! That's hard stuff!

(You'll have to pardon my method of responding here. No internet from out here in the bush. But I can generate new posts via email. So welcome to my way of responding to comments!)

Saturday, October 8, 2011

Hull Assembly

This weekend, I was able to finish the dry assembly of the entire Shan Skailyn hull. Then I double checked how it would all fit together with the bolt hole alignment. Had to clamp it after passing the bolts through due to a mix up in my hardware order. Got the right bolts this time, but the wrong hex nuts. All clamped together, everything is good and true. Everything is square with less than 2mm difference between diagonal measurements. That shouldn't cause any problems right?
I know I've already said this, but 24' is one big canoe! You don't realize it till it's together! I'm starting to wonder how I'm going to have to rearrange things when I'm working on it as one entire hull.
After checking it all, I managed to glue up both end sections. I might manage to be able to fillet the watertight bulkheads in place if I have a bit more time tomorrow afternoon (sunday).
Oh yeah, I got the sixth and final coat of varnish on her leeboard and rudder. Decided to go with what may be overkill with 5 thick coats (sanded in between each coat) and 1 thin final coat. I don't know of any 'spar' varnish available in country here, so I'm just using the next best thing; exterior varnish. Hopefully the many coats with a good sanding between each coat will give me a nice long lasting protective coat. That pretty much finishes things up on the leeboard and rudder now. Hardware is all done. Woodwork and finish is all done. Pix forthcoming.