Wednesday, August 17, 2011

Shan_Skailyn_paint_job_possibilities2.png

The attached file was originally sent with another message.

File Name: Shan_Skailyn_paint_job_possibilities2.png

Doodlin'

(Sorry, this might be a bit confusing, but the picture that was the last post and the text from this post were both supposed to be ONE post! Our email system does that to me sometimes. Wreaks all kinds of havoc. So here's the text that should have come with the picture.)

Over the last few nights, while my wife, Shannon, and I were watching some pre-recorded episodes of Criminal Minds (that's what we do in the evenings here in the bush!), I was doodling away at some design possibilities for Shan Skailyn's eventual paint job. All three incorporate a design that is used as a primary element, in one variation or another, in just about all the Mibu people's carvings. Since I live and work with these folks and feel a part of the community in many ways, I wanted to include artistic features unique to their identity. So here are my sketched out ideas. I'm thinking of just staining and varnishing the gunwale a dark color. One of my friends here, Lookas, is going to carve the pattern (very light relief carving) of the design seen on the lower of the two pictures here all along the gunwale. I'll then stain the whole thing, do a whitewash to fill the carving with some white for contrast and then varnish over the whole thing... the gunwale, that is.

I'm open to any comments as to what paint design appeals the most? My personal favorite so far is the bottom one. It's possible I could get some other ideas before actually painting Shan Skailyn since that time is obviously a long way off. But for now, the bottom one seems the best to me. 


Sunday, August 14, 2011

Getting the dry run out of my system

OK, I know I just posted something today about the hardware I worked on yesterday (sat). BUT, after we hiked back up from the church meeting this morning, I had a little bit of spare time. The idea of having all the pieces for the hull ready to assemble, but holding off because of a shortage of nails is driving me nuts. Next best thing... do the dry run to make sure everything is going to fit right and to make sure all is good and square. Didn't take long at all (about 1/2 hour) and was totally worth it! Nice to see some fruit from my labors instead of all these small pieces. This is it, Shan Skailyn's hull coming together! I had my friend Trip (pronounced 'Tree') help me with bending the stern together. For now, I'm happy to see it held together just with screws. Actually had my family come down to check out the momentous occasion! Trip's wife, Jepit, was watching (and laughing) through the whole process too. Trip and Jepit have never seen anything like this built before so it's fascinating to them! Fun to watch them watching and hear their comments throughout!
So I measured all the angles and distances and everything is totally square! Whew!
Oh yeah, I also put an initial coat of varnish on the rudder and leeboard yesterday.

Hardware finished

Not the prettiest things in the world, but I finally got all the metal hardware done that Shan Skailyn is going to need. One is the 6-1/4" diameter aluminum reinforcing plate for the leeboard. The welded nut was done by a friend of mine stateside some months ago and then sent to me here in Papua New Guinea. Then the other piece of hardware other is the rudder hardware. Even though the rudder hardware isn't super pretty, it's got real smooth action when mounted. I know, I know... $20 could have gotten me some proper rudder hardware, but at this point I'm needing to avoid any more spending where possible. Can't wait to see how it all works!

Saturday, August 13, 2011

Bamboo spars

Well, over this last week my bamboo 'order' started trickling in a piece at a time. I asked one of my friends here in Mibu, whose name is Sesi, who's wanting to make a little cash, to bring me some variations of bamboo so I can dry it and see what's going to work best for my spars. All the bamboo he brought was of the variety they call 'bovat' here; a very thick walled type of bamboo that when dry is extremely strong. I also had him bring a couple pieces of straight solid timber as well just to be sure. What has been brought up so far looks like it's going to do the trick! I think I'm going to use the solid timber for the stub mast. Then for my luff spar and boom I'll use bamboo. Reason for using the solid timber for the stub mast is because of future considerations. Should I ever have to replace it, I think trying to find an exact matching piece of bamboo would be very difficult. But working a solid piece of timber to fit the mast step is easier. I also think the forces on around the mast step might risk splitting bamboo.
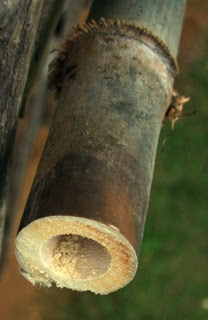
Anyway, everything is quite straight. There are a couple minor bends in the bamboo. So I am experimenting (see pic with red straps). I am bending the bamboo just a little bit beyond the shape I want it to be, hoping that once dry in a couple months, it will maintain that form. If not, the bends are minor enough that it's no big deal. I had to do this with two of the pieces that were brought up. One of the other pieces was cut a couple months ago and submerged in a fish pond for a couple weeks. Sesi then dried it before bringing it up. It's quite a bit bigger than the specified size. But it is soooo light weight and much stronger than the solid wood piece that was brought up of equal diameter!
I experimented on a couple pieces with curing over a fire. I wasn't too pleased with the results... at least on this kind of bamboo. It took a really long time just to do one little section and the look wasn't nice. I think maybe the thickness of the walls makes it tougher to do this on. I originally tried it over my gas grill, but it just wasn't doing the trick so we made a quick bonfire and used that. But like I said, just wasn't happy with the results. Maybe I was doing things wrong? I think from here on out I'm going to stand the stuff up to dry and fill the topmost segment with some potent bug spray which is supposed to then seep down through the circulatory system before it dries.
As far as a final coating, I'm going to have to settle for some light sanding and varnishing. I tested this out over a month ago on a scrap piece. gave the surface a light sanding, then cleaned it with acetone, then applied a single coat of varnish. After it dried, I just left it out on the grass in the rain and sun. There's not a bit of it so far that is coming off. That little section of bamboo is looking very good actually.
I would appreciate all the thoughts and advice on using bamboo as I can get. I've had some great comments in the past about fire curing. Not sure why that's not working well for me.


Sunday, August 7, 2011

Just Plane Fun

Planing, planing, and more planing. That's pretty much all I've done during the little bits of time I spent working on Shan Skailyn this weekend. Well, that and shaping with a rasp and belt sander. Oh yeah, and I worked a bit more on the rudder hardware.
Since the hull is on standby until I get more of my ring shank nails, I'm working on the many other small things that will undoubtedly encompass many of the required hours to get Shan Skailyn ready to sail.
What I was planing so much was the leeboard and the rudder. They've been completed shaped at this point and I'm quite happy with how they turned out. It was surprisingly difficult to give them the right shape. I drew out the profile first and cut it out of a template so that I could lay it over the curved face to compare with and shave off where needed. Finished things out with the rasp and belt sander. Pretty much all that's needed now is a good once over with some 120 grit and they'll be ready to have 5 or so coats of polyurethane. In case anyone is curious about the weight of the leeboard (remember my concern in the last post?) it's down to just 5.8 kgs (12.8 lbs). Still kind of heavy in my estimation, but I think we're going to leave it. If, when Shan Skailyn is completed, it seems some weight needs to be dropped, then I'll just have to make a new one someday.
The rudder hardware is coming along nicely. I'm getting my stainless from an old washing machine tub. It's been rather hard to cut! I've also had difficulty bending the pieces exactly as I want too. So far I've got one piece completed, another one partially bent and two others to shape up a bit more before bending to their final shape. Bolt holes will come later. I figured it would be difficult to bend everything with precision, so it didn't make much sense to try to drill those first and go through the heartache of not having them line up later. Glad I made that decision. It would have happened just as I suspected.
Oh yeah, one sad piece of info to add... I broke my only bandsaw blade. Yes, let the tears flow. Will have to work on getting a new one here somehow in the coming months.


Monday, August 1, 2011

Beginnings of leeboard and rudder


I didn't get a whole lot of time this weekend to work on Shan Skailyn. I'm out of 3/4" ring nails at this point. So I'm waiting for more of those so I can start assembling the hull which sits, just about ready for that next step.
Instead I started working on some of the other parts. I cut and laminated the timber for both the rudder and the leeboard. Got both of those planed down to thickness, and even managed to cut out the blank for the leeboard. Regarding the leeboard, I'm a bit concerned about the weight. I imagine that it undergoes a fair bit of stress, so I used a fairly strong wood that also ends up being a bit heavy. Actually, when I laminated it, I alternated between the heavier wood and a lighter wood in an attempt to cut down on the weight. Anyway, what I've ended up with after I've planed it down to thickness, cut out the blank, and not having yet shaped it, is a leeboard that weighs just over 7 kgs (about 15.5 lbs). Isn't that weight a bit excessive for a leeboard? Seems heavy to me. I would guess about 3-5 more pounds will be taken off once it is all shaped. Based on knowledgeable feedback, I may just have to re-make it with lighter timber.
I also began cutting up my sheet of stainless steel into pieces to use for the rudder hardware. That is some hard stuff to cut! I broke my last sawzall blade for cutting metal. So then I switched to my skil saw with a metal blade. I did manage to barely finish cutting my pieces before the last of the blade was worn down. Hopefully I can manage to avoid any major mistakes with these. I have nothing left to cut new pieces with! It's tin snips and grinders and files from here on out. Once I finish cutting these, I'll have to find a way to bend them all with a fair bit of precision so that all the holes for the through bolts (for securing to both the rudder and kick up assembly) as well as the holes for the hinge pin match up. If I end up not finding a way to bend them that precisely, then the other option would be to bend them before drilling the holes, then put a scrap piece of lumber between the bent 'flaps' and then drill through all of it at the same time.