After more than 15 months, our family was finally able to get back out to Madang for a break. Of course, Shan Skailyn was out of storage and put to good use immediately. The seas were mostly flat and winds mild. But there were enough days with decent and even slightly stronger wind to get out there and have some fun. I compiled some video footage here.
This time out, I feel I was able to get my confidence up handling the boat by myself in some stronger, gustier winds. I'm feeling ready to start venturing out further next time, outside the relative safety of our little bay and the shelter of all the little islands. I'd love to start taking Shan Skailyn to some different nearby areas. There's even a little resort nearby (Jais Aben) I could sail to, enjoy a lunch, and sail back. How great would that be?!
Sailin' Shan Skailyn from geoff husa on Vimeo.
A note on a few things: If you remember, I chose to use bamboo for the spars, a decision I wasn't super confident on originally but tried just to see what would happen and how they would hold up. These spars have now been in use for about 2 years and have been through a lot, especially on the maiden voyage up the coast. Now, even after sitting in hot storage for over 15 months, they've held up very well. No bugs have gotten to them, I see no sign of deterioration, and that split that I repaired in initial construction has held up wonderfully. For any of you builders out there, I would highly recommend the use of bamboo if you have access to it.
I'm really pleased with how the rest of the hull and other elements have held up over time. I haven't had to do any fiberglass repairs yet on the bottom, though I do touch up the paint every time I'm packing Shan Skailyn up to put away again. Most of the need for touch up of paint though is my trailer. Seems that pulling Shan Skailyn up over carpet wears that paint right off.
To fix this I've ordered some flat rollers and steel rod to install on Shan Skailyn's trailer. Each flat roller is 2.5" diameter and rubber. The plan is to cut the rollers into 3" or 4" lengths and span them across as evenly as possible in four places in the lower half of the trailer where most of the boat weight sits, especially when hauling out of the water. I'm hoping the rubber and the quantity of the rollers will be an even enough distribution of weight to not risk damage to the boat. Hopefully it will reduce the need to retouch paint all the time too. And finally, I'm really hoping it will make it easier to get the thing up on the trailer by myself. Right now, I can do it, but it's quite difficult.
Oh, and I glued some heavy duty protective rubber pieces, right where the crossbeams lash to the hull. Sorry, I forgot to take pictures! I find that the crossbeams continually wear away at least at the paint there, and even a bit into the plywood. I am hoping the rubber will keep that from happening. I'm not sure what the stuff is called, but it's the stuff that is glued to the leading edge of cessna wings to protect from flying debris on grass airstrips. I got some old stuff from some airplane mechanics I know.
I am continually concerned about termites. Right now the boat is stored up on top of a 20' shipping container, directly under a roof. Termites are a real problem in Papua New Guinea and they've been known to build their little tunnels up the side of any material to reach some wood they're after. I dread coming out next time and finding such a mud tunnel leading up the side of the container to Shan Skailyn. I'm not sure what else I can do to prevent it either. If anyone has any ideas, I'm all ears! So far, I've ordered some diatomaceous earth to dust around the boat and on top of the container. I've read that's quite effective for most bugs including termites, as long as the dust stays dry. However, I'm not entirely convinced that DE would stop a mud tunnel.
Anyway, enjoy the video.
Showing posts with label bamboo. Show all posts
Showing posts with label bamboo. Show all posts
Saturday, January 24, 2015
Tuesday, December 18, 2012
Dig the Rig

Sunday, December 9, 2012
Reefy Reeferson!


Just FYI, this system reefs 25" of the foot of the sail, which is very nearly, if not a perfect, 1/3 of the total sail area, or about 27.7 square feet.
One thing I've noticed is that finding good pictures of all the details of a system's rigging have been hard to find (when I actually have access to internet in town, that is). If I can scrounge up the time, I'm hoping to put together some pictures of details of the rigging.
Tuesday, December 4, 2012
Reefing Conundrum


Because of the other friction problems, I've decided that a few spots need parrels. I looked high and low when I was in town last and could not find any suitable beads for the job. So I made my own out of some very dense, strong wood called 'kwila' which from what I understand is ironwood. So far, it looks like parrel beads at the head, the clew, and at the brailing line attachment point on the luff, will all serve their purpose well. Hoping I don't need any more than that to make it work.
I stewed and stewed about just how to go about making these parrel beads. Then it hit me! A small hole saw in the end grain of a piece of timber, then cross cut with the table saw. Then thread each one on a long bolt and work the things into shape with the orbital sander. Worked out pretty nice. I used similar methods to make my sheave as well.
No, I'm not into some kind of all natural funk or anything like that. Remember, I live in the middle of the jungle. No home depot, no Lowe's, no nothing. I would just order whatever I find lacking next time I'm out in town, except since it usually takes several months for me to get things I've ordered, and since the maiden voyage is coming up soon, in March, I have to make do with what I have. The added benefit is that I'm saving money this way too. Those parrel beads are expensive to buy online!
Will post pix of the finished assembly when everything is finished, which by the looks of it, may be a couple weeks. Got a lot going on that is limiting time spent on extracurricular activities.
Monday, September 10, 2012
All assembled... again


Saturday morning I disassembled the whole thing again and moved all the parts into our little office building where I store it here in Mibu. Now that I have everything built, I'd really like to weigh everything and get a total rigged weight. Really curious what that is. Will post when I do end up doing that.
Really the only difference in these pictures is that I have Shan Skailyn's hiking seats installed. I took a number of other photos of details that I'll post throughout the week. So stay tuned.
Thursday, August 30, 2012
Mast and Boom Assembly

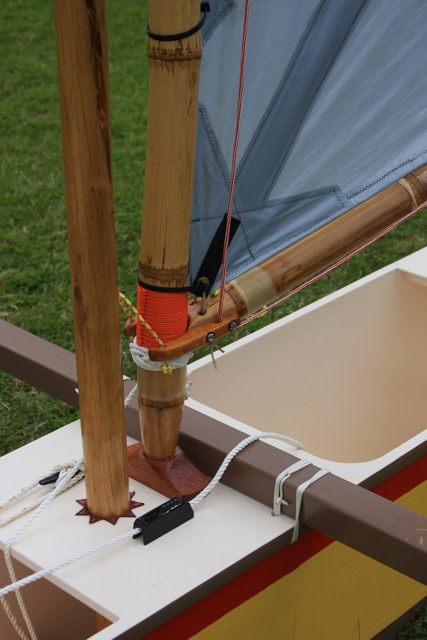
Note the two cleats on either side of the stub mast. The one on the right in the picture is for the halyard, so I can quickly release in case things feel out of control (necessary for this unexperienced wanna-be sailor). The other cleat is for the rope that keeps the luff spar tensioned in it's universal joint.
Saturday, August 25, 2012
Raise the Sail

Today was an exciting day! For the first time ever I got to see how Shan Skailyn's rigging is all going to work out. Raise that sail!
Monday, August 20, 2012
Bamboo Mast Completed


Currently working on building the reefing system into the sail and boom. Pix to follow!
Saturday, January 21, 2012
Boom Jaws and Varnish


Also, here are the pix of the boom jaws which are now complete other than a few holes for lashing the sail and downhaul, etc.
Saturday, January 14, 2012
Bamboo mast / luff spar


Today, I glued up the boom jaws (pix forthcoming - probably after boom jaws completed) and I also put some finishing touches on the luff spar. Since I want to be able to drop the whole thing at a moment's notice if things get hairy, I wanted some kind of quick releasing joint/mast step. I got this idea somewhere online... I think Gary D. mentioned it somewhere on his blog. Here you see the step assembly all together. Gary mentioned that this was the original universal joint that windsurfers used to use. The rope that passes through the step (located at deck level) will be tied off on a cleat (or maybe even a cam cleat for quicker release potential). Then the other side of the rope will have a loop tied in it, both to keep it from pulling through the mast base and also to secure the boom downhaul to. In this setup the mast base pivots freely in it's little socket joint / step. The luff spar is held upright by a halyard running through the top of the stub mast.
Today, besides gluing up the boom jaws, I applied the fiberglass wraps around the ends of the luff spar to help prevent splitting. I also had to doctor up a split about four fifths of the way up. I think it must have split when it was originally cut and fell. The split was there when my friend brought it up. This was such a nice piece of bamboo compared to the others I had available to me that I decided to take a chance and try to fix it. So today I pried the split open a bit, loaded it with thickened epoxy, even used a hypodermic needle to inject epoxy into the narrower parts. I then covered the split with a piece of fiberglass (see pic). I'm sure hoping this will hold up well for me. Anyone out there ever tried repairing a split in bamboo before? Any luck? I'd love to get your input. I'm wondering if I should also put several full wraps of fiberglass on there too, or was what I did enough?
Friday, October 14, 2011
Response to comment
Hey Bob from Arkansas, great info! Thanks a ton! A blacksmith, eh? I've been emailing Gary on occasion with my questions. Yes, he's always great to respond with helpful info. I'm trying not to bug him too much though! But he does seem happy to help when he can.
I'm curious what the wall thickness of the bamboo you use is. We've got some stuff here that is really thick walled. It's usually dried in the sun and doesn't crack unless you leave it out for a year or so. When it's dry, it's extremely lightweight and more rigid than an equal size diameter hardwood timber. The stuff I have drying now is just a bit bigger diameter than Gary recommends in his book (that should answer your other question about the book or the plans, BTW) but I'm thinking I'm going to give it a try anyway.
Stay tuned. I've had a busy week so haven't had the time to take and post pix of my final rudder and leeboard. I'm really pleased with how the rudder assembly turned out. It's got nice smooth action with just a small tolerance, seems like it's going to be really strong, and looks halfway decent. I sure used up some of my saw blades and drill bits cutting and shaping that stuff though! Wish I'd known about the cold chisel thing back then!
So, you're a blacksmith, eh? I'll have to keep you in mind sometime with some of the other practical projects I that are so inevitable around here.
Hey, any idea how I can drill a small hole through the end of a 1/4" diameter stainless steel shaft? I want to put cotter pin through it, but have only managed to bind up and break my small drill bits. Any ideas? I first hammered the end flat to make it a bit easier to drill through. Helped, but still no go! That's hard stuff!
(You'll have to pardon my method of responding here. No internet from out here in the bush. But I can generate new posts via email. So welcome to my way of responding to comments!)
Saturday, August 13, 2011
Bamboo spars


Anyway, everything is quite straight. There are a couple minor bends in the bamboo. So I am experimenting (see pic with red straps). I am bending the bamboo just a little bit beyond the shape I want it to be, hoping that once dry in a couple months, it will maintain that form. If not, the bends are minor enough that it's no big deal. I had to do this with two of the pieces that were brought up. One of the other pieces was cut a couple months ago and submerged in a fish pond for a couple weeks. Sesi then dried it before bringing it up. It's quite a bit bigger than the specified size. But it is soooo light weight and much stronger than the solid wood piece that was brought up of equal diameter!
I experimented on a couple pieces with curing over a fire. I wasn't too pleased with the results... at least on this kind of bamboo. It took a really long time just to do one little section and the look wasn't nice. I think maybe the thickness of the walls makes it tougher to do this on. I originally tried it over my gas grill, but it just wasn't doing the trick so we made a quick bonfire and used that. But like I said, just wasn't happy with the results. Maybe I was doing things wrong? I think from here on out I'm going to stand the stuff up to dry and fill the topmost segment with some potent bug spray which is supposed to then seep down through the circulatory system before it dries.
As far as a final coating, I'm going to have to settle for some light sanding and varnishing. I tested this out over a month ago on a scrap piece. gave the surface a light sanding, then cleaned it with acetone, then applied a single coat of varnish. After it dried, I just left it out on the grass in the rain and sun. There's not a bit of it so far that is coming off. That little section of bamboo is looking very good actually.
I would appreciate all the thoughts and advice on using bamboo as I can get. I've had some great comments in the past about fire curing. Not sure why that's not working well for me.
Sunday, July 10, 2011
Response to comment
DaveP, thanks a TON for your comments regarding bamboo and the construction method of your iakos. Extremely helpful. Since I've got plenty of time to wait, I'm planning on doing some tests on the particular type of bamboo that I'm planning on using here. I'll do one piece with fire, I'll leave one bare, I'll clean one with acetone before varnishing, and I'll sand and varnish another piece. I'll try to do that soon. When they're done, I'll leave them out in the rain and sun to see what happens to them over the next half year or so.
I'm planning on having my stub mast made out of wood and my luff spar and boom out of bamboo. I do have the option to use solid wood spars all around. There are tons of spindly, strong, lightweight woods around here that are straight as an arrow. The Mibu people harvest them all the time to make their ridge poles in their huts. However, I think the type of bamboo I'm looking at surpasses in both strength and lightness of weight. I also like the look. I just don't want to mess with having to custom make the step for the fixed mast should the bamboo ever have to be replaced. I'm thinking I want to make sure the mast only ever has to be done once.
The more I go along, the more I'm thinking how much I like the idea of making the hollow box frame iakos. I'd love to see a picture of what you've done. If you can manage to get a pic and message under 80kb email me a pic sometime. geoff_husa(at)ntmdotorg. The size restriction is because I pull all my emails over HF radio. It's SLOW and quite limited.
(You'll have to pardon my method of responding here. No internet from out here in the bush. But I can generate new posts via email. So welcome to my way of responding to comments!)
Saturday, July 2, 2011
Response to comment
DaveP, in your comments about curing bamboo you said, "don't be tempted to do any sanding, scraping." I'm curious if you happen to know why you shouldn't sand or scrape that outer layer? I've heard that before, but never heard why. It seems like a number of people out there do sand it off and then put varnish over it. But none of them ever mention how long their bamboo spars last. What's the importance of that outer 'skin'?
(You'll have to pardon my method of responding here. No internet from out here in the bush. But I can generate new posts via email. So welcome to my way of responding to comments!)
Wednesday, June 22, 2011
Bamboo
I've been looking into how best to coat my bamboo spars when they're ready. The advice one can find online ranges from passing through fire, scraping the outer layer off, sanding, varnish, glassing, and on and on and on it goes. Hmmm, what's the best?
I've heard that the outer layer of bamboo resists adherence to it. Any thoughts out there?
Found some folks that may know... the Texas Bamboo Society (Do they grow bamboo in Texas???). They're saying definitely do not take that outer layer off, but didn't say why. All the bamboo that they are knowledgeable about (they're not sure about the varieties available to me here in Papua New Guinea) have a waxy substance on the surface. So when you varnish, it ends up scaling off over time. They do recommend heat curing. Hmmm. I'll have to experiment. I'll also have to try acetone and see what that does for adhesion. Wouldn't that break down the oils/waxes pretty well?
Hoping to get a couple spars soaking submerged in water for a few weeks to de-starch the things here soon.
Any thoughts or advice out there about just how to treat my bamboo would be much appreciated. Surely there's some experienced users out there? Anyone have any luck with their coatings lasting a long time? Did you scrape? Sand? Remove much of the nodes? Leave them?
FYI, the kind of bamboo available to me that seems most likely to do the trick is a very thick walled bamboo that the Mibu people call 'bovat'. Down at the base it's so thick walled that there is nearly no opening at all. It dries lightweight and is extremely strong. A 1-1/2" dia piece with a wall thickness of maybe 1/4" spanning 6 feet will hold my body weight (190 lbs) and then some with only about an inch of flex. I'm planning on using Gary's recommended size (around 3 inch dia) and going for thicker walled stuff.
Subscribe to:
Posts (Atom)