It's been a whlie since I've posted anything to Shan Skailyn's blog! We're gearing up for a 2 week vacation in Madang here soon. Last time we took Shan Skailyn out I went through and noted a number of things that either need replacing or repairing. Most notably was the motor bracket / rudder mount. I knew when I first built that bracket that it would need replacing sooner than later. I had used cheap plywood from home depot in the US. Just needed to get it done. The plywood was starting to delaminate pretty badly!

So I ordered a 1/3 sheet of proper marine grade plywood out of Australia and had it flown up on one of our mission's regular flights from Cairns. Then I set about remaking the bracket. I worked hard to be sure that all the joints were as perfect as possible and that everything fit nicely. The whole thing is also reinforced with stainless screws. I dry fit it all together before gluing.
The glue up, which should have been pretty straight forward ended up being a huge pain in the rear! I bought this Selleys Fibreglass Fix kit. Just a head's up… stay away from this stuff! First off I didn't realize it was polyester resin when I bought it. I thought it was just plain epoxy resin. I double checked when I opened it and begin to mix. The smell was a lot different than I was used to with the epoxy I'd used in the past. Anyway, I mixed it all according to instructions, thickened it with sanded wood dust and glued up the bracket. Setting time was supposed to be 20 minutes. 24 hours later, I realized that this stuff wasn't setting at all. Still goopy as ever. So I figured perhaps I didn't mix it thoroughly enough. Took the whole motor bracket apart, scraped off all the old stuff, cleaned it up with acetone, dried it, sanded, and set about regluing. This time I double checked the instructions, added a few extra drops of hardener to be sure, thickened with diatomaceous earth and reglued. Prior to thickening I took a dab out and put it aside on a piece of wood so as to guage how it's setting. 24 hours later still nothing… 48 hours later still nothing… nearly 6 days later, I finally gave up. The stuff was just soaking into the wood but was not setting at all! Neither was the little test piece I'd set aside prior to thickening. So, I took it all apart again, scraped, cleaned, dried and sanded. I ended up finding some epoxy glue laying around (the kind in the double syringe) and used that this time. I would have no time for thickening because this stuff sets in 5 minutes! So I had to mix small batches and move quickly! That one little kit was the perfect amount for the job and I'm glad to see it set! I'm slightly concerned that perhaps the wood still had some uncured polyester resin on it and keep the epoxy from bonding fully. I did clean it thoroughly with acetone though prior to gluing. Went over it 4x to be sure to get as much of that nasty polyester off of there as possible.

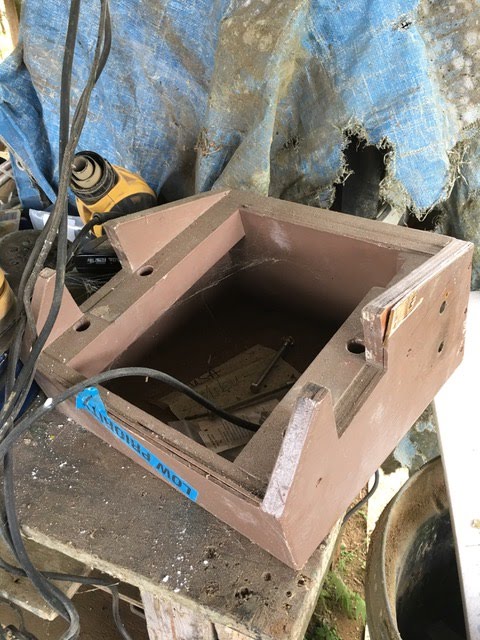
I painted the bracket green because I had no other paint in here. It doesn't match the boat at all. But no matter. When we go out to town I'll buy a bit of paint and have it mixed to match the brown trim of the boat. Note how I moved away from my slight modification of Gary D's motor bracket design. It now has been made almost nearly according to his specifications which means I needed to fashion up a couple of thick stainless brackets to mount the bracket on the rear iako. Once again I cannibalized some of my co-worker's old washing machine tub for these. I followed Gary's lead in gluing some rubber on the side that will be pressing on the iako in order to prevent excess wear and tear on the beam.

Other stuff that needed some attention was remaking all the rubber lashing for attaching bamboo polas, creating some larger diameter washers for the ama bolts where they connect the two ama pieces together. I've noticed that because of the relatively small size of the current washers, the pressure has impressed the washers into the wood a little deeper than I am comfortable with. I wanted to spread out the force a bit more there. I also had one of my paddles, the handle of which delaminated way back when. Finally fixed that. Also, I made some storage sheaths to aid in the ease of putting the rigging, and iakos up into storage. Now instead of trying to wrap it all after I've hoisted it all up under the eaves of the workshop, I can put each piece into it's respective sheath, then just put it up there and forget it. Should be much easier. Then finally, when we get out to Madang, one of the first things I'll have to do direct on the hull is repair a bit of the fore seat on the mid-section of the hull. Someone apparently (maybe me???) used it as a handle and I'm seeing the plywood seat has lifted a bit off the cross beam to which it is glued. So I'm going to need to glue and screw that down and add a bit of reinforcement as well.
Oh yeah, I also bought a block/cleat combo in hopes that I can rig something up to improve the downhaul. Right now, it's a pain as I have to push down on the boom jaws while pulling the downhaul line taught, then somehow maintain it while tying a quick release knot. Usually I'm doing that little adjustment while under sail because I either didn't tighten enough during initial setting the sail, or that little quick release knot likes to slip. I'm thinking if I can rig this block/cleat combo up right, it ought to make tightening the luff of the sail a cinch! Will post pix if and when I get that figured out. Hoping I don't need more hardware to make it happen.
Nice. Please post a picture when you get it fully installed.
ReplyDeleteCheers,
-jak